
一、Elasticsearch简介
Elasticsearch是一个基于 Lucene 构建的开源搜索引擎,它提供了全文搜索、结构化搜索、聚合分析和数据存储等功能。它天生分布式、高性能、高可用、易扩展、易维护,支持多种编程语言,并能够在多种操作系统上运行。Elasticsearch广泛应用于网站搜索、企业级搜索、日志分析、安全情报等领域。
二、搭建背景
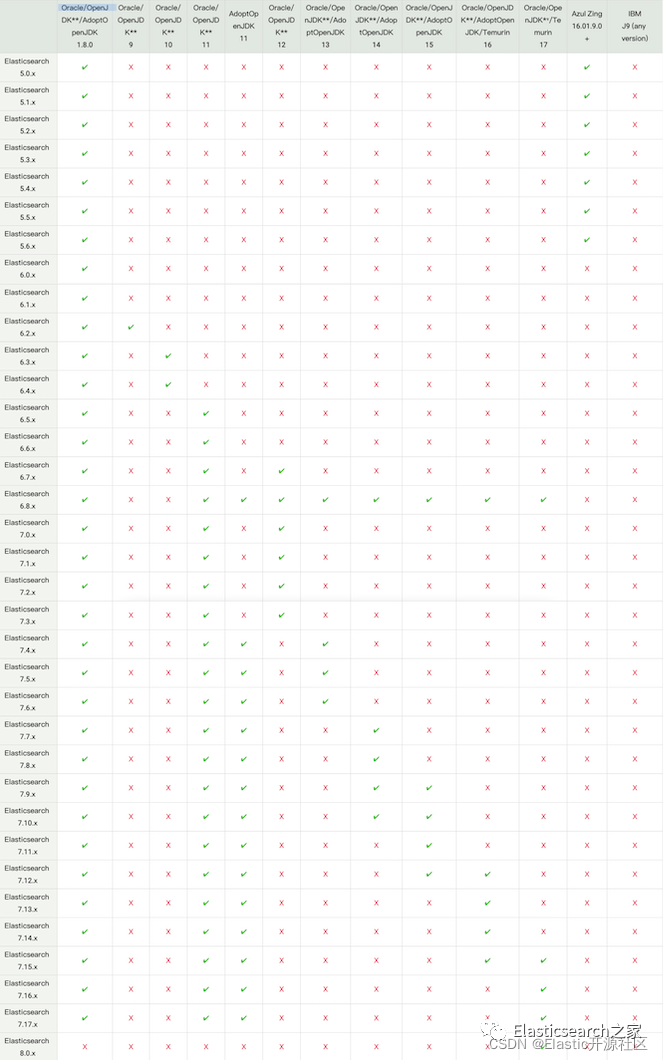
最近公司新增项目需要使用 ES 进行加速数据查询,云上的 ServerLess Elasticsearch的费用高不少,项目同事需要在自建的集群。记得之前搭建的 ES 还是 6.x 版本,现在官方提供的 8.x 版本相对来说复杂了一点,下面介绍搭建8.x 版本步骤。
三、集群规划

四、操作系统环境设置(主要设置)
打开的文件句柄数和线程数。以及虚拟内存设置
vim /etc/security/limits.conf
#最大句柄数
* soft nofile 65536
* hard nofile 65536
#线程数
* soft nproc 65536
* hard nproc 65536
#虚拟机内存设置无限制
* soft memlock unlimited
* hard memlock unlimited
禁用交换
[root@bigdataes1011 ~]# cat /etc/fstab
/dev/mapper/centos-root /                       xfs     defaults        0 0
UUID=984f99bd-0b89-4270-8ec0-296e8765f63c /boot                   xfs     defaults        0 0
#/dev/mapper/centos-swap swap                    swap    defaults        0 0
/dev/sdb /mnt/data ext4 defaults,noatime,nofail 0 0
TCP 重传超时
sysctl -w net.ipv4.tcp_retries2=5
官方链接:https://www.elastic.co/guide/en/elasticsearch/reference/current/setting-system-settings.html#ulimit
创建目录和授权
useradd elasticsearch
mkdir /app
mkdir /data/elasticsearch/{data,logs}
chown elastic
search:elasticsearch data/elasticsearch/*
五、上传安装包并解压
tar -zxvf elasticsearch-8.7.0-linux-x86_64.tar.gz -C /app
chown -R elasticsearch:elasticsearch /app/elasticsearch-8.7.0
1. 修改配置文件
es-node1:
# 设置 ES 集群名称
cluster.name: es-cluster
# 设置集群中当前节点名称
node.name: es-node1
# 设置数据,日志文件路径
path.data: /data/elasticsearch/data
path.logs: /data/elasticsearch/logs
# 设置网络访问节点
network.host:192.168.10.11
# 设置网络访问端口
http.port: 9200
# 设置集群内节点之间的内部通信端口
transport.port: 9300
# 初始节点
discovery.seed_hosts: ["192.168.10.11", "192.168.10.12", "192.168.10.13"]
#
cluster.initial_master_nodes: ["es-node1", "es-node2","es-node3"]

# 允许 JVM 锁住内存,禁止操作系统交换出去
bootstrap.memory_lock: true

# 启用或跨源资源共享,浏览器是否可以对Elasticsearch执行请求
http.cors.enabled: true
#
http.cors.allow-origin: "*"
http.cors.allow-headers: Authorization
ingest.geoip.downloader.enabled: false

# 安全认证
xpack.security.enabled: true
xpack.security.enrollment.enabled: true
xpack.security.http.ssl:
 enabled: true
 keystore.path: certs/http.p12
 truststore.path:certs/http.p12
xpack.security.transport.ssl:
 enabled: true
 verification_mode: certificate
 keystore.path: certs/elastic-certificates.p12
 truststore.path: certs/elastic-certificates.p12
es-node2:
node.name: es-node2
network.host:192.168.10.12
es-node3:
node.name: es-node3
network.host:192.168.10.13
2. 生成证书
步骤 1:生成或创建认知中心
可以增加参数,自定义设置证书的有效时间,设置了 10 年过期的证书
./bin/elasticsearch-certutil ca --days 3650

步骤 2:生成 TCP tls 加密通信的证书
同理也可以设置证书有效时间,下面我设置证书有效时间为 10 年
./bin/elasticsearch-certutil cert --ca elastic-stack-ca.p12 --days 3650

步骤 3:生成 Http 的证书


3. 生成证书移动到指定目录

小插曲,查看证书的过期时间,将 p12 文件转成 pem 文件才能查看:
 openssl pkcs12 -in elastic-certificates.p12 -out elastic-certificates.pem -nodes
 cat elastic-certificates.pem | openssl x509 -noout -enddate

4.将密码存储在密钥库
由于之前设置的密码都是空的,以下输入密码都是空(回车即可)
./bin/elasticsearch-keystore add xpack.security.transport.ssl.keystore.secure_password
./bin/elasticsearch-keystore add xpack.security.transport.ssl.truststore.secure_password
./bin/elasticsearch-keystore add xpack.security.http.ssl.keystore.secure_password
./bin/elasticsearch-keystore add xpack.security.http.ssl.truststore.secure_password
5. 设置用户密码
bin/elasticsearch-setup-passwords auto
重置密码:
bin/elasticsearch-reset-password -u elastic
6.堆内存:大小和交换
-Xms4g
-Xmx4g
官网参考链接:https://www.elastic.co/guide/cn/elasticsearch/guide/current/heap-sizing.html
六、启动 elasticsearch
nohup /app/elasticsearch-8.7.0/bin/elasticsearch &
nohup /app/elasticsearch-8.7.0/bin/elasticsearch &
检查集群是否健康,若集群状态为 green,说明集群健康,否则查看日志排查问题。

七、部署 kibana8.x
tar -zxvf kibana-8.7.1-linux-x86_64.tar.gz -C /app/
将 5.2 的 http 证书拷贝到 config 目录下
cp elasticsearch-ca.pem /app/kibana-8.7.1/config/
修改配置文件
cd /app/kibana-8.7.1/
vim config/kibana.yml
# 配置文件记录
server.host: "0.0.0.0"
server.publicBaseUrl: "http://192.168.10.11:5601"
elasticsearch.hosts: ["https://192.168.10.11:9200","https://192.168.10.12:9200","https://192.168.10.13:9200"]
elasticsearch.username: "kibana_system"
elasticsearch.password: "GpX-rfrwhSFy0aE_4Y*B"
elasticsearch.requestTimeout: 30000
elasticsearch.ssl.certificateAuthorities: [ "/app/kibana-8.7.1/config/elasticsearch-ca.pem" ]
elasticsearch.ssl.verificationMode: full
i18n.locale: "zh-CN"
启动 kibana
cd /app/kibana-8.7.1/
nohup bin/kibana &


以上是 elasticsearch-8.7.1 版在 linux 服务器上搭建集群大致过程

![【学习强国】[挑战答题]带选项完整题库(2020年4月20日更新)-武穆逸仙](https://www.iwmyx.cn/wp-content/uploads/2019/12/timg-300x200.jpg)


![【学习强国】[新闻采编学习(记者证)]带选项完整题库(2019年11月1日更新)-武穆逸仙](https://www.iwmyx.cn/wp-content/uploads/2019/12/77ed36f4b18679ce54d4cebda306117e-300x200.jpg)


