最近搞了好长一段时间的 elk,这篇文章主要会详细介绍 elk 集群的搭建,并启用 ssl 加密之后该如何配置和使用,万字长文,建议收藏以备不时之需。废话不多说,开始。
一、架构
-
整体架构
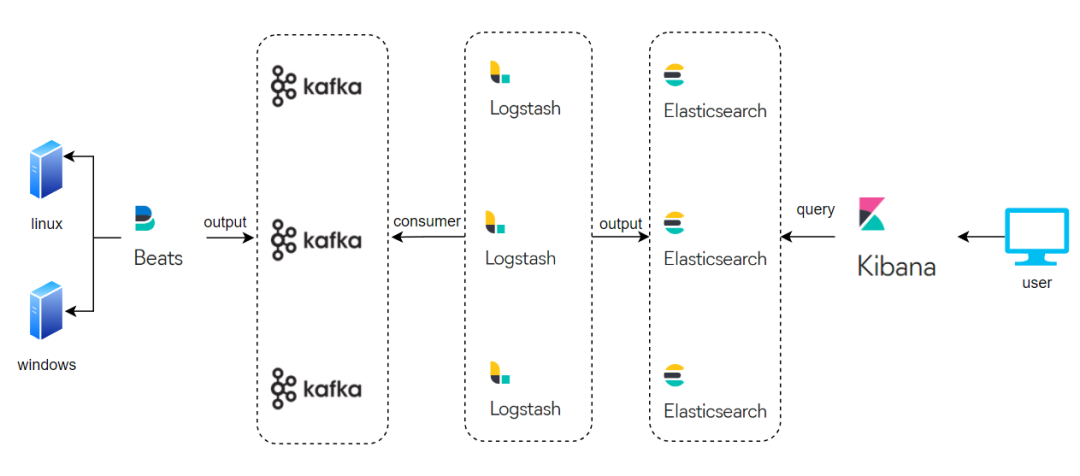
通过 beats 组件采集目标端日志,然后输出到 kafka 集群,logstash 去 kafka 中消费日志并对日志进行清洗过滤,最后存到 es 集群中,用户通过 kibana 进行日志的查询。
-
节点部署架构
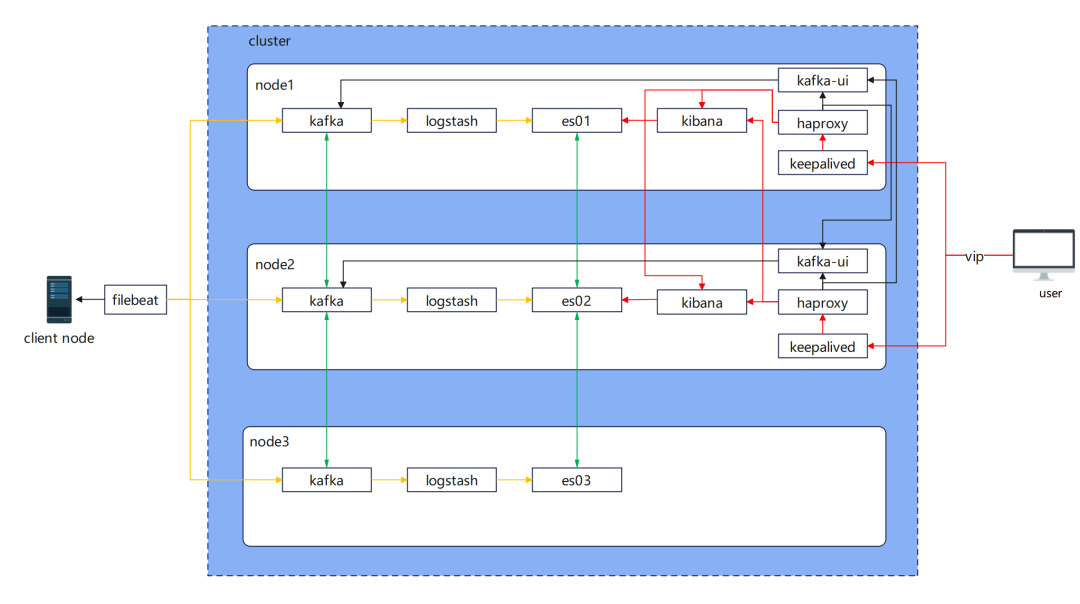
实际部署过程中还用到了 keepalived,实现虚拟 IP 的故障转移。用 haproxy 实现 kibana、kafka-ui 负载均衡,kafka-ui 主要查看 kafka 中的一些数据和配置项目。
二、准备工作
-
主机及网络规划
|
OS |
主机名 |
IP |
部署服务 |
|
Centos7.9 |
es01 |
192.168.31.168 |
kafka+kafka-ui+logstash+es01+kibana+keepalived+haproxy |
|
Centos7.9 |
es02 |
192.168.31.171 |
kafka+kafka-ui+logstash+es02+kibana+keepalived+haproxy |
|
Centos7.9 |
es03 |
192.168.31.172 |
kafka+logstash+es03 |
|
Centos7.9 |
vip |
192.168.31.173 |
|
|
Centos7.9 |
centos79 |
192.168.31.79 |
filebeat |
-
配置国内 yum 源(所有节点)
$ cd /etc/yum.repos.d
$ mkdir bak
$ mv * bak
#最小化安装,如果没有 wget 的命令,可使用 curl 代替 wget,执行如下语句代替:
$ curl -o /etc/yum.repos.d/Centos-7.repo http://mirrors.aliyun.com/repo/Centos-7.repo
$ curl -o /etc/yum.repos.d/epel-7.repo http://mirrors.aliyun.com/repo/epel-7.repo
$ curl -o /etc/yum.repos.d/docker-ce.repo http://mirrors.aliyun.com/docker-ce/linux/centos/docker-ce.repo
$ sed -i "s/aliyuncs/aliyun/g" *.repo
$ sed -i "s/https/http/g" *.repo
$ yum clean all
$ yum makecache fast
$ yum list
$ yum install wget vim net-tools ntpdate -y
$ ntpdate ntp1.aliyun.com
3. 部署 docker(所有节点)
安装 docker,参考文档:https://docs.docker.com/engine/install/centos/
$ sudo yum remove docker \
                  docker-client \
                  docker-client-latest \
                  docker-common \
                  docker-latest \
                  docker-latest-logrotate \
                  docker-logrotate \
                  docker-engine
$ sudo yum install docker-ce docker-ce-cli containerd.io docker-buildx-plugin docker-compose-plugin

$ sudo systemctl start docker
$ sudo systemctl enable docker
$ sudo systemctl status docker

#这里大概率会拉不下来,因为国内已经无法直接访问 docekrhub 以及国内的镜像站都被迫关停了,需要使用自己代理(参考之前的文章)或者从国外服务器拉下来再传上来的方式(真操蛋)
$ sudo docker run --rm hello-world
修改 docker 配置文件,添加自己的代理仓库:
{
 "registry-mirrors": ["https://xxxxxx"]
}
重启 docker:
$ sudo systemctl restart docker
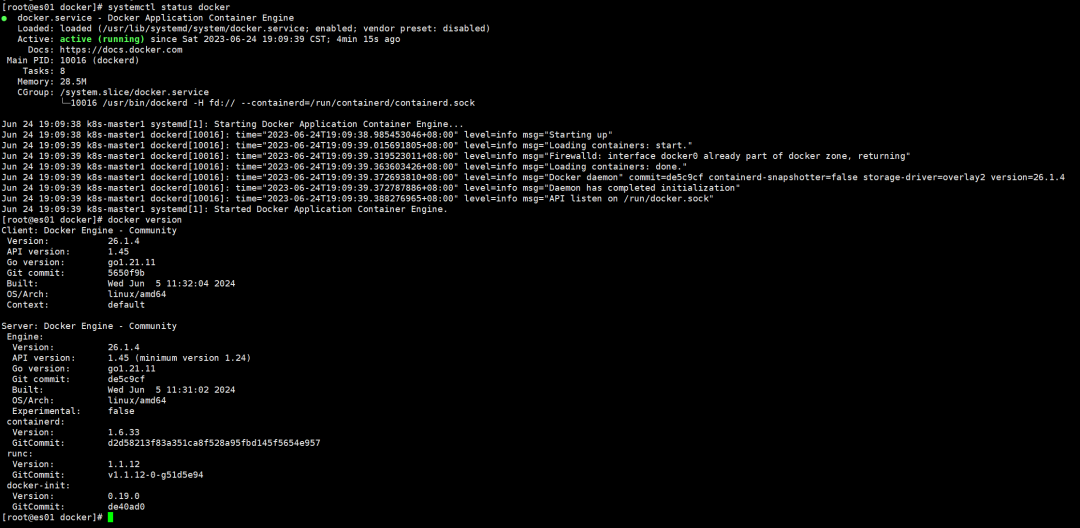
-
拉取镜像(所有节点))
$ docker pull bitnami/kafka:3.3
$ docker pull provectuslabs/kafka-ui:v0.7.2
$ docker pull docker.elastic.co/elasticsearch/elasticsearch:7.17.22
$ docker pull docker.elastic.co/kibana/kibana:7.17.22
$ docker pull docker.elastic.co/logstash/logstash:7.17.22
5. 生成证书(任意一节点)
es 内部通信证书(transport):
参考文档
https://www.elastic.co/guide/en/elasticsearch/reference/7.17/configuring-tls-docker.html
$ cd /opt/certs/http
$ cat >easyops.ext <
http 通信证书:
$ cd /opt/certs/http
$ cat >easyops.ext <
三、部署过程
3.1 部署 es
-
创建目录,并将生成的证书放到各个节点的对应目录
# node01
$ mkdir -p /data/elasticsearch/{data,plugins,logs,config}
$ mkdir -p /data/elasticsearch/config/certs/{transport,http}
$ cp /opt/certs/transport/certs/ca/ca.crt /data/elasticsearch/config/certs/transport
$ cp /opt/certs/transport/certs/es01/* /data/elasticsearch/config/certs/transport
$ cp /opt/certs/http/{ca.crt,server.crt,server.key} /data/elasticsearch/config/certs/http

# node02
$ mkdir -p /data/elasticsearch/{data,plugins,logs,config}
$ mkdir -p /data/elasticsearch/config/certs/{transport,http}

# node03
$ mkdir -p /data/elasticsearch/{data,plugins,logs,config}
$ mkdir -p /data/elasticsearch/config/certs/{transport,http}

# node1
$ scp /opt/certs/transport/certs/es02/* 192.168.31.171:/data/elasticsearch/config/certs/transport
$ scp /data/elasticsearch/config/certs/http/* 192.168.31.171:/data/elasticsearch/config/certs/http
$ scp /opt/certs/transport/certs/es03/* 192.168.31.172:/data/elasticsearch/config/certs/transport
$ scp /data/elasticsearch/config/certs/http/* 192.168.31.172:/data/elasticsearch/config/certs/http
2. 编写配置文件
es01:
$ vim /data/elasticsearch/config/customer.options
# 根据实际情况设置,不要超过 32G
-Xms1g
-Xmx1g

$ vim /data/elasticsearch/config/elasticsearch.yml
# https://www.elastic.co/guide/en/elasticsearch/reference/7.17/configuring-tls-docker.html#_prepare_the_environment

cluster.name: "easyops-es-cluster"
discovery.seed_hosts: ["192.168.31.168","192.168.31.171","192.168.31.172"]
cluster.initial_master_nodes: ["192.168.31.168","192.168.31.171","192.168.31.172"]
node.name: 192.168.31.168
node.roles: [ master, data, ingest ]
network.host: 0.0.0.0
network.publish_host: 192.168.31.168
http.port: 9200
path.logs: /usr/share/elasticsearch/logs
ingest.geoip.downloader.enabled: false

# monitoring
xpack.monitoring.collection.enabled: true

# xpack
xpack.license.self_generated.type: basic
xpack.security.enabled: true

xpack.security.http.ssl.enabled: true
xpack.security.http.ssl.key: /usr/share/elasticsearch/config/certs/http/server.key
xpack.security.http.ssl.certificate_authorities: /usr/share/elasticsearch/config/certs/http/ca.crt
xpack.security.http.ssl.certificate: /usr/share/elasticsearch/config/certs/http/server.crt

xpack.security.transport.ssl.enabled: true
xpack.security.transport.ssl.verification_mode: certificate
xpack.security.transport.ssl.certificate_authorities: /usr/share/elasticsearch/config/certs/transport/ca.crt
xpack.security.transport.ssl.certificate: /usr/share/elasticsearch/config/certs/transport/es01.crt
xpack.security.transport.ssl.key: /usr/share/elasticsearch/config/certs/transport/es01.key
es02:
$ vim /data/elasticsearch/config/customer.options
# 根据实际情况设置,不要超过 32G
-Xms1g
-Xmx1g

$ vim /data/elasticsearch/config/elasticsearch.yml
# https://www.elastic.co/guide/en/elasticsearch/reference/7.17/configuring-tls-docker.html#_prepare_the_environment

cluster.name: "easyops-es-cluster"
discovery.seed_hosts: ["192.168.31.168","192.168.31.171","192.168.31.172"]
cluster.initial_master_nodes: ["192.168.31.168","192.168.31.171","192.168.31.172"]
node.name: 192.168.31.171
node.roles: [ master, data, ingest ]
network.host: 0.0.0.0
network.publish_host: 192.168.31.171
http.port: 9200
path.logs: /usr/share/elasticsearch/logs
ingest.geoip.downloader.enabled: false

# monitoring
xpack.monitoring.collection.enabled: true

# xpack
xpack.license.self_generated.type: basic
xpack.security.enabled: true

xpack.security.http.ssl.enabled: true
xpack.security.http.ssl.key: /usr/share/elasticsearch/config/certs/http/server.key
xpack.security.http.ssl.certificate_authorities: /usr/share/elasticsearch/config/certs/http/ca.crt
xpack.security.http.ssl.certificate: /usr/share/elasticsearch/config/certs/http/server.crt

xpack.security.transport.ssl.enabled: true
xpack.security.transport.ssl.verification_mode: certificate
xpack.security.transport.ssl.certificate_authorities: /usr/share/elasticsearch/config/certs/transport/ca.crt
xpack.security.transport.ssl.certificate: /usr/share/elasticsearch/config/certs/transport/es02.crt
xpack.security.transport.ssl.key: /usr/share/elasticsearch/config/certs/transport/es02.key
es03:
$ vim /data/elasticsearch/config/customer.options
# 根据实际情况设置,不要超过 32G
-Xms1g
-Xmx1g

$ vim /data/elasticsearch/config/elasticsearch.yml
# https://www.elastic.co/guide/en/elasticsearch/reference/7.17/configuring-tls-docker.html#_prepare_the_environment

cluster.name: "easyops-es-cluster"
discovery.seed_hosts: ["192.168.31.168","192.168.31.171","192.168.31.172"]
cluster.initial_master_nodes: ["192.168.31.168","192.168.31.171","192.168.31.172"]
node.name: 192.168.31.172
node.roles: [ master, data, ingest ]
network.host: 0.0.0.0
network.publish_host: 192.168.31.172
http.port: 9200
path.logs: /usr/share/elasticsearch/logs
ingest.geoip.downloader.enabled: false

# monitoring
xpack.monitoring.collection.enabled: true

# xpack
xpack.license.self_generated.type: basic
xpack.security.enabled: true

xpack.security.http.ssl.enabled: true
xpack.security.http.ssl.key: /usr/share/elasticsearch/config/certs/http/server.key
xpack.security.http.ssl.certificate_authorities: /usr/share/elasticsearch/config/certs/http/ca.crt
xpack.security.http.ssl.certificate: /usr/share/elasticsearch/config/certs/http/server.crt

xpack.security.transport.ssl.enabled: true
xpack.security.transport.ssl.verification_mode: certificate
xpack.security.transport.ssl.certificate_authorities: /usr/share/elasticsearch/config/certs/transport/ca.crt
xpack.security.transport.ssl.certificate: /usr/share/elasticsearch/config/certs/transport/es03.crt
xpack.security.transport.ssl.key: /usr/share/elasticsearch/config/certs/transport/es03.key
-
编写 docker-compose.yaml
es01:
version: "3"
services:
  es01:
    image: docker.elastic.co/elasticsearch/elasticsearch:7.17.22
    container_name: es01
    networks:
      - net-es
    volumes:
      - $PWD/data:/usr/share/elasticsearch/data
      - $PWD/config/elasticsearch.yml:/usr/share/elasticsearch/config/elasticsearch.yml
      - $PWD/config/certs:/usr/share/elasticsearch/config/certs
      - $PWD/config/customer.options:/usr/share/elasticsearch/config/jvm.options.d/customer.options
      - $PWD/logs:/usr/share/elasticsearch/logs
      - $PWD/plugins:/usr/share/elasticsearch/plugins
    environment:
      - bootstrap.memory_lock=true
      - TZ=Asia/Shanghai
      - ELASTIC_PASSWORD=$ELASTIC_PASSWORD
    ulimits:
      memlock:
        soft: -1
        hard: -1
      nofile:
        soft: 1000000
        hard: 1000000
    sysctls:
      - vm.max_map_count=262144
    ports:
      - "9200:9200"
      - "9300:9300"
    healthcheck:
      test: curl --cacert $CERTS_DIR/ca/ca.crt -s https://localhost:9200 >/dev/null; if [[ $$? == 52 ]]; then echo 0; else echo 1; fi
      interval: 30s
      timeout: 10s
      retries: 5
networks:
  net-es:
    external: false
es02:
version: "3"
services:
  es02:
    image: docker.elastic.co/elasticsearch/elasticsearch:7.17.22
    container_name: es02
    networks:
      - net-es
    volumes:
      - $PWD/data:/usr/share/elasticsearch/data
      - $PWD/config/elasticsearch.yml:/usr/share/elasticsearch/config/elasticsearch.yml
      - $PWD/config/certs:/usr/share/elasticsearch/config/certs
      - $PWD/config/customer.options:/usr/share/elasticsearch/config/jvm.options.d/customer.options
      - $PWD/logs:/usr/share/elasticsearch/logs
      - $PWD/plugins:/usr/share/elasticsearch/plugins
    environment:
      - bootstrap.memory_lock=true
      - TZ=Asia/Shanghai
      - ELASTIC_PASSWORD=$ELASTIC_PASSWORD
    ulimits:
      memlock:
        soft: -1
        hard: -1
      nofile:
        soft: 1000000
        hard: 1000000
    sysctls:
      - vm.max_map_count=262144
    ports:
      - "9200:9200"
      - "9300:9300"
    healthcheck:
      test: curl --cacert $CERTS_DIR/ca/ca.crt -s https://localhost:9200 >/dev/null; if [[ $$? == 52 ]]; then echo 0; else echo 1; fi
      interval: 30s
      timeout: 10s
      retries: 5
networks:
  net-es:
    external: false
es03:
version: "3"
services:
  es03:
    image: docker.elastic.co/elasticsearch/elasticsearch:7.17.22
    container_name: es03
    networks:
      - net-es
    volumes:
      - $PWD/data:/usr/share/elasticsearch/data
      - $PWD/config/elasticsearch.yml:/usr/share/elasticsearch/config/elasticsearch.yml
      - $PWD/config/certs:/usr/share/elasticsearch/config/certs
      - $PWD/config/customer.options:/usr/share/elasticsearch/config/jvm.options.d/customer.options
      - $PWD/logs:/usr/share/elasticsearch/logs
      - $PWD/plugins:/usr/share/elasticsearch/plugins
    environment:
      - bootstrap.memory_lock=true
      - TZ=Asia/Shanghai
      - ELASTIC_PASSWORD=$ELASTIC_PASSWORD
    ulimits:
      memlock:
        soft: -1
        hard: -1
      nofile:
        soft: 1000000
        hard: 1000000
    sysctls:
      - vm.max_map_count=262144
    ports:
      - "9200:9200"
      - "9300:9300"
    healthcheck:
      test: curl --cacert $CERTS_DIR/ca/ca.crt -s https://localhost:9200 >/dev/null; if [[ $$? == 52 ]]; then echo 0; else echo 1; fi
      interval: 30s
      timeout: 10s
      retries: 5
networks:
  net-es:
    external: false
-
修改权限(三节点同样操作)
$ chcon -R -t container_file_t /data/elasticsearch/
$ setfacl -b -R /data/elasticsearch/
$ chown -R 1000:1000 /data/elasticsearch
5. 开放防火墙(三节点同样操作)
$ sudo firewall-cmd --add-port=9200/tcp --permanent
$ sudo firewall-cmd --add-port=9300/tcp --permanent
$ sudo firewall-cmd --reload
$ sudo firewall-cmd --list-all
6. 启动 3 个节点(三个节点一样)
$ cd /data/elasticsearch
$ sudo docker compose up -d
7. 设置用户密码(为 elastic, kibana_system, logstash_system, beats_system, apm_system, remote_monitoring_user 这些用户设置密码),PS:Elasticsearch 在 7.0.0 之后免费使用 x-pack
参考文档:https://www.elastic.co/guide/en/elasticsearch/reference/7.17/built-in-users.html#bootstrap-elastic-passwords
$ sudo docker exec -it es01 /bin/bash
root@4d9c3fe0b30a:/usr/share/elasticsearch# bin/elasticsearch-setup-passwords interactive
Initiating the setup of passwords for reserved users elastic,apm_system,kibana,kibana_system,logstash_system,beats_system,remote_monitoring_user.
You will be prompted to enter passwords as the process progresses.
Please confirm that you would like to continue [y/N]y


Enter password for [elastic]:
Reenter password for [elastic]:
Enter password for [apm_system]:
Reenter password for [apm_system]:
Enter password for [kibana_system]:
Reenter password for [kibana_system]:
Enter password for [logstash_system]:
Reenter password for [logstash_system]:
Enter password for [beats_system]:
Reenter password for [beats_system]:
Enter password for [remote_monitoring_user]:
Reenter password for [remote_monitoring_user]:
Changed password for user [apm_system]
Changed password for user [kibana_system]
Changed password for user [kibana]
Changed password for user [logstash_system]
Changed password for user [beats_system]
Changed password for user [remote_monitoring_user]
Changed password for user [elastic]
root@4d9c3fe0b30a:/usr/share/elasticsearch#
注意:bin/elasticsearch-setup-passwords interactive 只能运行一次
如果执行的时候报错:
java.security.cert.CertificateException: No subject alternative names matching IP address 192.168.31.168 found
        at sun.security.util.HostnameChecker.matchIP(HostnameChecker.java:164) ~[?:?]
        at sun.security.util.HostnameChecker.match(HostnameChecker.java:101) ~[?:?]
        at sun.security.ssl.X509TrustManagerImpl.checkIdentity(X509TrustManagerImpl.java:458) ~[?:?]
        at sun.security.ssl.X509TrustManagerImpl.checkIdentity(X509TrustManagerImpl.java:432) ~[?:?]
        at sun.security.ssl.X509TrustManagerImpl.checkTrusted(X509TrustManagerImpl.java:238) ~[?:?]
        at sun.security.ssl.X509TrustManagerImpl.checkServerTrusted(X509TrustManagerImpl.java:132) ~[?:?]
        at org.elasticsearch.common.ssl.DiagnosticTrustManager.checkServerTrusted(DiagnosticTrustManager.java:83) ~[elasticsearch-ssl-config-7.17.7.jar:7.17.7]
        at sun.security.ssl.CertificateMessage$T13CertificateConsumer.checkServerCerts(CertificateMessage.java:1335) ~[?:?]
        at sun.security.ssl.CertificateMessage$T13CertificateConsumer.onConsumeCertificate(CertificateMessage.java:1226) ~[?:?]
        at sun.security.ssl.CertificateMessage$T13CertificateConsumer.consume(CertificateMessage.java:1169) ~[?:?]
        at sun.security.ssl.SSLHandshake.consume(SSLHandshake.java:396) ~[?:?]
        at sun.security.ssl.HandshakeContext.dispatch(HandshakeContext.java:480) ~[?:?]
        at sun.security.ssl.HandshakeContext.dispatch(HandshakeContext.java:458) ~[?:?]
        at sun.security.ssl.TransportContext.dispatch(TransportContext.java:201) ~[?:?]
        at sun.security.ssl.SSLTransport.decode(SSLTransport.java:172) ~[?:?]
        at sun.security.ssl.SSLSocketImpl.decode(SSLSocketImpl.java:1510) ~[?:?]
        at sun.security.ssl.SSLSocketImpl.readHandshakeRecord(SSLSocketImpl.java:1425) ~[?:?]
        at sun.security.ssl.SSLSocketImpl.startHandshake(SSLSocketImpl.java:455) ~[?:?]
        at sun.security.ssl.SSLSocketImpl.startHandshake(SSLSocketImpl.java:426) ~[?:?]
        at sun.net.www.protocol.https.HttpsClient.afterConnect(HttpsClient.java:578) ~[?:?]
        at sun.net.www.protocol.https.AbstractDelegateHttpsURLConnection.connect(AbstractDelegateHttpsURLConnection.java:187) ~[?:?]
        at sun.net.www.protocol.https.HttpsURLConnectionImpl.connect(HttpsURLConnectionImpl.java:142) ~[?:?]
        at org.elasticsearch.xpack.core.common.socket.SocketAccess.lambda$doPrivileged$0(SocketAccess.java:42) ~[x-pack-core-7.17.7.jar:7.17.7]
        at java.security.AccessController.doPrivileged(AccessController.java:569) [?:?]
        at org.elasticsearch.xpack.core.common.socket.SocketAccess.doPrivileged(SocketAccess.java:41) [x-pack-core-7.17.7.jar:7.17.7]
        at org.elasticsearch.xpack.security.authc.esnative.tool.CommandLineHttpClient.execute(CommandLineHttpClient.java:116) [x-pack-security-7.17.7.jar:7.17.7]
        at org.elasticsearch.xpack.security.authc.esnative.tool.SetupPasswordTool$SetupCommand.checkElasticKeystorePasswordValid(SetupPasswordTool.java:327) [x-pack-security-7.17.7.jar:7.17.7]
        at org.elasticsearch.xpack.security.authc.esnative.tool.SetupPasswordTool$InteractiveSetup.execute(SetupPasswordTool.java:199) [x-pack-security-7.17.7.jar:7.17.7]
        at org.elasticsearch.cli.EnvironmentAwareCommand.execute(EnvironmentAwareCommand.java:77) [elasticsearch-7.17.7.jar:7.17.7]
        at org.elasticsearch.cli.Command.mainWithoutErrorHandling(Command.java:112) [elasticsearch-cli-7.17.7.jar:7.17.7]
        at org.elasticsearch.cli.MultiCommand.execute(MultiCommand.java:95) [elasticsearch-cli-7.17.7.jar:7.17.7]
        at org.elasticsearch.cli.Command.mainWithoutErrorHandling(Command.java:112) [elasticsearch-cli-7.17.7.jar:7.17.7]
        at org.elasticsearch.cli.Command.main(Command.java:77) [elasticsearch-cli-7.17.7.jar:7.17.7]
        at org.elasticsearch.xpack.security.authc.esnative.tool.SetupPasswordTool.main(SetupPasswordTool.java:128) [x-pack-security-7.17.7.jar:7.17.7]

SSL connection to https://192.168.31.168:9200/_security/_authenticate?pretty failed: No subject alternative names matching IP address 192.168.31.168 found
Please check the elasticsearch SSL settings under xpack.security.http.ssl.
先将 elasticsearch.yml 中下面的配置注释,添加完密码以后再启动进行设置:
#xpack.security.http.ssl.enabled: true
#xpack.security.http.ssl.key: /usr/share/elasticsearch/config/certs/http/es.key
#xpack.security.http.ssl.certificate_authorities: /usr/share/elasticsearch/config/certs/http/ca.crt
#xpack.security.http.ssl.certificate: /usr/share/elasticsearch/config/certs/http/es.crt
另外这个命令在集群启动之后只需要在任意一个节点设置一次即可,如果其中一个节点设置过之后再去其他节点操作会报下面的信息:
root@1be87b393667:/usr/share/elasticsearch# bin/elasticsearch-setup-passwords interactive

Failed to authenticate user 'elastic' against http://192.168.31.168:9200/_security/_authenticate?pretty
Possible causes include:
 * The password for the 'elastic' user has already been changed on this cluster
 * Your elasticsearch node is running against a different keystore
   This tool used the keystore at /usr/share/elasticsearch/config/elasticsearch.keystore


ERROR: Failed to verify bootstrap password
8. 查看集群状态(任意一节点)
#curl -XGET --cacert /data/elasticsearch/config/certs/http/ca/ca.crt -u elastic:xxxxx 'https://127.0.0.1:9200/_cluster/health?pretty'
$ curl -XGET -k -u elastic:xxxxx 'https://127.0.0.1:9200/_cluster/health?pretty'
{
  "cluster_name" : "easyops-es-cluster",
  "status" : "green",
  "timed_out" : false,
  "number_of_nodes" : 3,
  "number_of_data_nodes" : 3,
  "active_primary_shards" : 6,
  "active_shards" : 12,
  "relocating_shards" : 0,
  "initializing_shards" : 0,
  "unassigned_shards" : 0,
  "delayed_unassigned_shards" : 0,
  "number_of_pending_tasks" : 0,
  "number_of_in_flight_fetch" : 0,
  "task_max_waiting_in_queue_millis" : 0,
  "active_shards_percent_as_number" : 100.0
}
3.2 部署 kibana
-
创建目录
$ mkdir -p /data/kibana/{config,data,certs}
$ cp /data/elasticsearch/config/certs/http/* /data/kibana/certs
-
编写 docker-compose.yaml
$ cat /data/kibana/docker-compose.yaml
version: "3"
services:
  kibana:
    image: docker.elastic.co/kibana/kibana:7.17.22
    container_name: kibana
    restart: always
    volumes:
      - ./certs:/usr/share/kibana/certs
      - ./data:/usr/share/kibana/data
      - ./config/kibana.yml:/usr/share/kibana/config/kibana.yml:rw
    ports:
      - 5601:5601
    environment:
      TZ: "Asia/Shanghai"
    healthcheck:
      test:
        [
          "CMD-SHELL",
          "curl -s -I http://localhost:5601 | grep -q 'HTTP/1.1 302 Found'",
        ]
      interval: 10s
      timeout: 10s
      retries: 120
    networks:
      - net-kibana
networks:
  net-kibana:
    external: false
3. 编写配置文件
$ cat /data/kibana/config/kibana.yml
server.name: kibana
server.host: 0.0.0.0
elasticsearch.hosts: ["https://192.168.31.168:9200", "https://192.168.31.171:9200", "https://192.168.31.172:9200"]
server.publicBaseUrl: "https://logging.easyops.local"
monitoring.ui.container.elasticsearch.enabled: true
# 这里设置为 false,因为接下来我们需要把证书放在 haproxy 上,防止在 haproxy 代理的时候出现问题
server.ssl.enabled: false
server.ssl.key: /usr/share/kibana/certs/server.key
server.ssl.certificate: /usr/share/kibana/certs/server.crt
server.ssl.certificateAuthorities: /usr/share/kibana/certs/ca.crt
elasticsearch.ssl.verificationMode: none

## X-Pack security credentials
xpack.security.enabled: true
elasticsearch.username: kibana_system
elasticsearch.password: xxxxxxxx

xpack.security.authc.providers:
  basic.basic1:
    order: 0
  anonymous.anonymous1:
    order: 1
    credentials:
      username: "itsapp_anonymous_default"
      password: "xxxxxxxx"4. 修改权限
$ chcon -R -t container_file_t /data/kibana/
$ setfacl -b -R /data/kibana/
$ chown -R 1000:1000 /data/kibana
5. 启动
$ docker compose up -d
-
防火墙开放端口
$ firewall-cmd --add-port=5601/tcp --permanent
$ firewall-cmd --reload
$ firewall-cmd --list-all
7. 测试
浏览器访问:http://192.168.31.168:5601
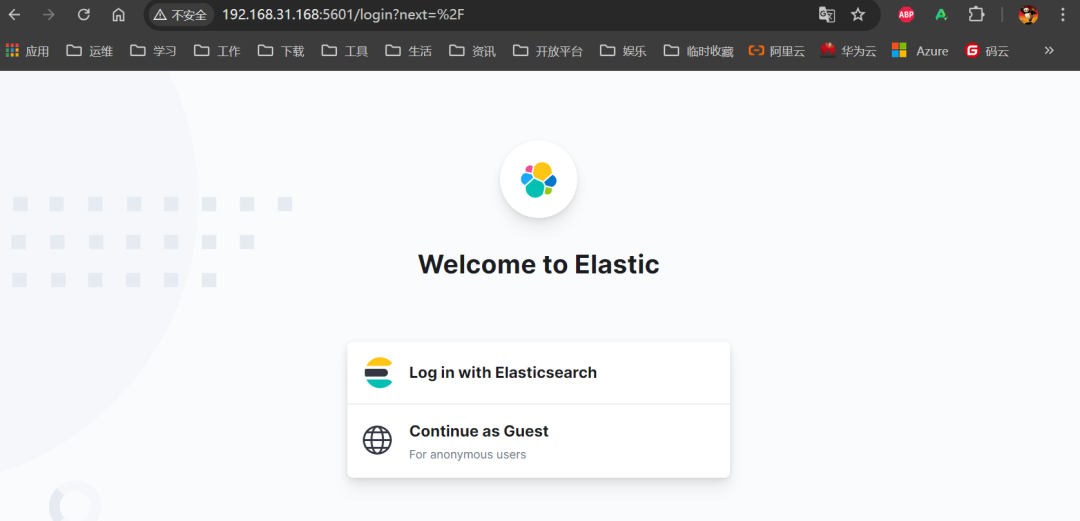
可以使用前面 es 设置的 elastic 用户及其密码登录测试。
-
同样方式部署 node02,更换本地 hosts 指向 node02 的 IP 测试,后面部署好 haproxy 和 keepalived 再解析到 VIP 测试。
3.3 部署 kafka+kafka-ui
-
创建相关目录
$ mkdir /data/kafka/{conf,kraft} -p
-
编写 docker-compose
$ cat /data/kafka/docker-compose.yaml
version: "3"
services:
  #kafka 可视化工具
  kafka-ui:
    container_name: kafka-ui
    image: provectuslabs/kafka-ui:v0.7.2
    container_name: kafka-ui
    ports:
      - 8080:8080
    environment:
      - KAFKA_CLUSTERS_0_NAME=kafka-easyops
      - KAFKA_CLUSTERS_0_BOOTSTRAPSERVERS=192.168.31.168:9092,192.168.31.171:9092,192.168.31.172:9092
      - DYNAMIC_CONFIG_ENABLED=true
      - TZ=Asia/Shanghai
    networks:
      - kafka

  # kafka 集群
  kafka1:
    image: "bitnami/kafka:3.3.1"
    container_name: kafka1
    user: root
    ports:
      - 9092:9092
      - 9093:9093
    environment:
      ### 通用配置
      # 允许使用 kraft,即 Kafka 替代 Zookeeper
      - KAFKA_ENABLE_KRAFT=yes
      # kafka 角色,做 broker,也要做 controller
      - KAFKA_CFG_PROCESS_ROLES=broker,controller
      # 指定供外部使用的控制类请求信息
      - KAFKA_CFG_CONTROLLER_LISTENER_NAMES=CONTROLLER
      # 定义 kafka 服务端 socket 监听端口
      - KAFKA_CFG_LISTENERS=PLAINTEXT://:9092,CONTROLLER://:9093
      # 定义安全协议
      - KAFKA_CFG_LISTENER_SECURITY_PROTOCOL_MAP=CONTROLLER:PLAINTEXT,PLAINTEXT:PLAINTEXT
      # 使用 Kafka 时的集群 id,集群内的 Kafka 都要用这个 id 做初始化,生成一个 UUID 即可
      - KAFKA_KRAFT_CLUSTER_ID=LelM2dIFQkiUFvXCEcqRWA
      # 集群地址
      - KAFKA_CFG_CONTROLLER_QUORUM_VOTERS=1@192.168.31.168:9093,2@192.168.31.171:9093,3@192.168.31.172:9093
      # 允许使用 PLAINTEXT 监听器,默认 false,不建议在生产环境使用
      - ALLOW_PLAINTEXT_LISTENER=yes
      # 设置 broker 最大内存,和初始内存
      - KAFKA_HEAP_OPTS=-Xmx512m -Xms512m
      # 允许自动创建主题
      - KAFKA_CFG_AUTO_CREATE_TOPICS_ENABLE=true
      # 消息保留时长(毫秒),保留 7 天
      - KAFKA_LOG_RETENTION_MS=604800000
      # 每个分区每次获取消息的最大字节数
      - KAFKA_CFG_MAX_PARTITION_FETCH_BYTES=10485760
      # 客户端向 Kafka 服务器发送请求的最大大小(以字节为单位)
      - KAFKA_CFG_MAX_REQUEST_SIZE=10485760
      ### broker 配置
      # 定义外网访问地址(宿主机 ip 地址和端口),注意每个节点都需要改成自己的
      - KAFKA_CFG_ADVERTISED_LISTENERS=PLAINTEXT://192.168.31.168:9092
      # broker.id,必须唯一
      - KAFKA_BROKER_ID=1
      # 时区
      - TZ=Asia/Shanghai
    volumes:
      - $PWD/conf/server.properties:/opt/bitnami/kafka/config/server.properties
      - $PWD/conf/producer.properties:/opt/bitnami/kafka/config/producer.properties
      - $PWD/conf/consumer.properties:/opt/bitnami/kafka/config/consumer.properties
      - $PWD/kraft:/bitnami/kafka
    networks:
      - kafka

networks:
  kafka:
    driver: bridge
kafka-ui 如果想接 ldap 认证可以参考这篇文档:https://docs.kafka-ui.provectus.io/configuration/authentication
-
创建配置文件
$ cd /data/kafka/conf
$ cat consumer.properties
# Licensed to the Apache Software Foundation (ASF) under one or more
# contributor license agreements.  See the NOTICE file distributed with
# this work for additional information regarding copyright ownership.
# The ASF licenses this file to You under the Apache License, Version 2.0
# (the "License"); you may not use this file except in compliance with
# the License.  You may obtain a copy of the License at
#
#    http://www.apache.org/licenses/LICENSE-2.0
#
# Unless required by applicable law or agreed to in writing, software
# distributed under the License is distributed on an "AS IS" BASIS,
# WITHOUT WARRANTIES OR CONDITIONS OF ANY KIND, either express or implied.
# See the License for the specific language governing permissions and
# limitations under the License.
# see org.apache.kafka.clients.consumer.ConsumerConfig for more details

# list of brokers used for bootstrapping knowledge about the rest of the cluster
# format: host1:port1,host2:port2 ...
bootstrap.servers=localhost:9092

# consumer group id
group.id=test-consumer-group

# What to do when there is no initial offset in Kafka or if the current
# offset does not exist any more on the server: latest, earliest, none
#auto.offset.reset=

max.partition.fetch.bytes=10485760
$ cat producer.properties
# Licensed to the Apache Software Foundation (ASF) under one or more
# contributor license agreements.  See the NOTICE file distributed with
# this work for additional information regarding copyright ownership.
# The ASF licenses this file to You under the Apache License, Version 2.0
# (the "License"); you may not use this file except in compliance with
# the License.  You may obtain a copy of the License at
#
#    http://www.apache.org/licenses/LICENSE-2.0
#
# Unless required by applicable law or agreed to in writing, software
# distributed under the License is distributed on an "AS IS" BASIS,
# WITHOUT WARRANTIES OR CONDITIONS OF ANY KIND, either express or implied.
# See the License for the specific language governing permissions and
# limitations under the License.
# see org.apache.kafka.clients.producer.ProducerConfig for more details

############################# Producer Basics #############################

# list of brokers used for bootstrapping knowledge about the rest of the cluster
# format: host1:port1,host2:port2 ...
bootstrap.servers=localhost:9092

# specify the compression codec for all data generated: none, gzip, snappy, lz4, zstd
compression.type=none

# name of the partitioner class for partitioning records;
# The default uses "sticky" partitioning logic which spreads the load evenly between partitions, but improves throughput by attempting to fill the batches sent to each partition.
#partitioner.class=

# the maximum amount of time the client will wait for the response of a request
#request.timeout.ms=

# how long `KafkaProducer.send` and `KafkaProducer.partitionsFor` will block for
#max.block.ms=

# the producer will wait for up to the given delay to allow other records to be sent so that the sends can be batched together
#linger.ms=

# the maximum size of a request in bytes
max.request.size=10485760

# the default batch size in bytes when batching multiple records sent to a partition
#batch.size=

# the total bytes of memory the producer can use to buffer records waiting to be sent to the server
#buffer.memory=
$ cat server.properties
# Licensed to the Apache Software Foundation (ASF) under one or more
# contributor license agreements.  See the NOTICE file distributed with
# this work for additional information regarding copyright ownership.
# The ASF licenses this file to You under the Apache License, Version 2.0
# (the "License"); you may not use this file except in compliance with
# the License.  You may obtain a copy of the License at
#
#    http://www.apache.org/licenses/LICENSE-2.0
#
# Unless required by applicable law or agreed to in writing, software
# distributed under the License is distributed on an "AS IS" BASIS,
# WITHOUT WARRANTIES OR CONDITIONS OF ANY KIND, either express or implied.
# See the License for the specific language governing permissions and
# limitations under the License.

#
# This configuration file is intended for use in ZK-based mode, where Apache ZooKeeper is required.
# See kafka.server.KafkaConfig for additional details and defaults
#

############################# Server Basics #############################

# The id of the broker. This must be set to a unique integer for each broker.
broker.id=1

############################# Socket Server Settings #############################

# The address the socket server listens on. If not configured, the host name will be equal to the value of
# java.net.InetAddress.getCanonicalHostName(), with PLAINTEXT listener name, and port 9092.
#   FORMAT:
#     listeners = listener_name://host_name:port
#   EXAMPLE:
#     listeners = PLAINTEXT://your.host.name:9092
listeners=PLAINTEXT://:9092,CONTROLLER://:9093

# Listener name, hostname and port the broker will advertise to clients.
# If not set, it uses the value for "listeners".
advertised.listeners=PLAINTEXT://192.168.31.168:9092

# Maps listener names to security protocols, the default is for them to be the same. See the config documentation for more details
listener.security.protocol.map=CONTROLLER:PLAINTEXT,PLAINTEXT:PLAINTEXT

# The number of threads that the server uses for receiving requests from the network and sending responses to the network
num.network.threads=3

# The number of threads that the server uses for processing requests, which may include disk I/O
num.io.threads=8

# The send buffer (SO_SNDBUF) used by the socket server
socket.send.buffer.bytes=102400

# The receive buffer (SO_RCVBUF) used by the socket server
socket.receive.buffer.bytes=102400

# The maximum size of a request that the socket server will accept (protection against OOM)
socket.request.max.bytes=209715200


############################# Log Basics #############################

# A comma separated list of directories under which to store log files
log.dirs=/bitnami/kafka/data

# The default number of log partitions per topic. More partitions allow greater
# parallelism for consumption, but this will also result in more files across
# the brokers.
num.partitions=1

# The number of threads per data directory to be used for log recovery at startup and flushing at shutdown.
# This value is recommended to be increased for installations with data dirs located in RAID array.
num.recovery.threads.per.data.dir=1

############################# Internal Topic Settings  #############################
# The replication factor for the group metadata internal topics "__consumer_offsets" and "__transaction_state"
# For anything other than development testing, a value greater than 1 is recommended to ensure availability such as 3.
offsets.topic.replication.factor=1
transaction.state.log.replication.factor=1
transaction.state.log.min.isr=1

############################# Log Flush Policy #############################

# Messages are immediately written to the filesystem but by default we only fsync() to sync
# the OS cache lazily. The following configurations control the flush of data to disk.
# There are a few important trade-offs here:
#    1. Durability: Unflushed data may be lost if you are not using replication.
#    2. Latency: Very large flush intervals may lead to latency spikes when the flush does occur as there will be a lot of data to flush.
#    3. Throughput: The flush is generally the most expensive operation, and a small flush interval may lead to excessive seeks.
# The settings below allow one to configure the flush policy to flush data after a period of time or
# every N messages (or both). This can be done globally and overridden on a per-topic basis.

# The number of messages to accept before forcing a flush of data to disk
#log.flush.interval.messages=10000

# The maximum amount of time a message can sit in a log before we force a flush
#log.flush.interval.ms=1000

############################# Log Retention Policy #############################

# The following configurations control the disposal of log segments. The policy can
# be set to delete segments after a period of time, or after a given size has accumulated.
# A segment will be deleted whenever *either* of these criteria are met. Deletion always happens
# from the end of the log.

# The minimum age of a log file to be eligible for deletion due to age
log.retention.hours=168

# A size-based retention policy for logs. Segments are pruned from the log unless the remaining
# segments drop below log.retention.bytes. Functions independently of log.retention.hours.
#log.retention.bytes=1073741824

# The maximum size of a log segment file. When this size is reached a new log segment will be created.
#log.segment.bytes=1073741824

# The interval at which log segments are checked to see if they can be deleted according
# to the retention policies
log.retention.check.interval.ms=300000

############################# Zookeeper #############################

# Zookeeper connection string (see zookeeper docs for details).
# This is a comma separated host:port pairs, each corresponding to a zk
# server. e.g. "127.0.0.1:3000,127.0.0.1:3001,127.0.0.1:3002".
# You can also append an optional chroot string to the urls to specify the
# root directory for all kafka znodes.
zookeeper.connect=localhost:2181

# Timeout in ms for connecting to zookeeper
zookeeper.connection.timeout.ms=18000


############################# Group Coordinator Settings #############################

# The following configuration specifies the time, in milliseconds, that the GroupCoordinator will delay the initial consumer rebalance.
# The rebalance will be further delayed by the value of group.initial.rebalance.delay.ms as new members join the group, up to a maximum of max.poll.interval.ms.
# The default value for this is 3 seconds.
# We override this to 0 here as it makes for a better out-of-the-box experience for development and testing.
# However, in production environments the default value of 3 seconds is more suitable as this will help to avoid unnecessary, and potentially expensive, rebalances during application startup.
group.initial.rebalance.delay.ms=0

auto.create.topics.enable=true

controller.listener.names=CONTROLLER
controller.quorum.voters=1@192.168.31.168:9093,2@192.168.31.171:9093,3@192.168.31.172:9093

max.partition.fetch.bytes=10485760
max.request.size=10485760
process.roles=broker,controller
sasl.enabled.mechanisms=PLAIN,SCRAM-SHA-256,SCRAM-SHA-512
sasl.mechanism.inter.broker.protocol=
message.max.bytes=10485760
注意修改每个节点的下面参数:
broker.id=1
advertised.listeners=PLAINTEXT://192.168.31.168:9092
-
开放防火墙端口
$ firewall-cmd --add-port=8080/tcp --permanent
$ firewall-cmd --add-port=9092/tcp --permanent
$ firewall-cmd --add-port=9093/tcp --permanent
$ firewall-cmd --reload
$ firewall-cmd --list-all
-
启动
$ docker compose up -d
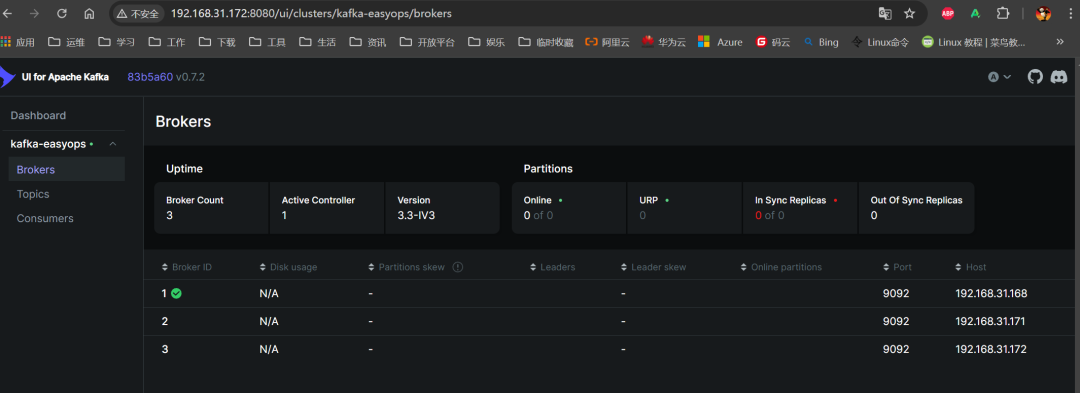
6. 使用浏览器访问测试(任意一节点 IP)
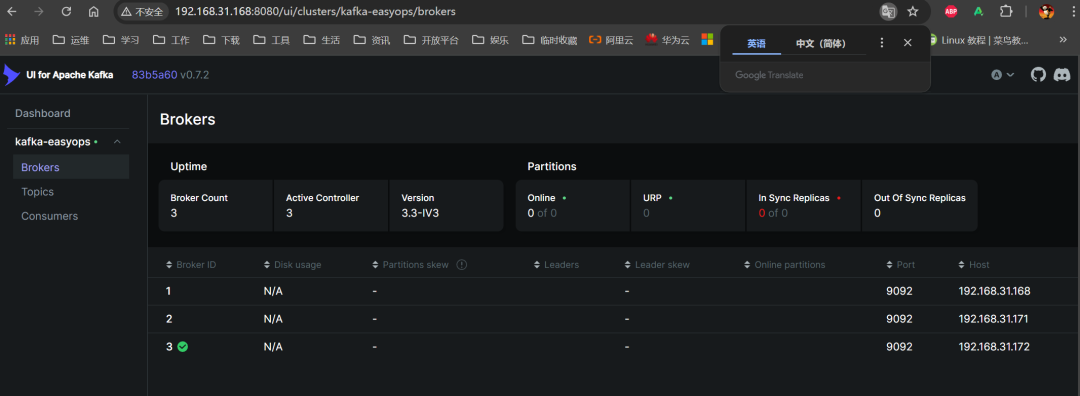
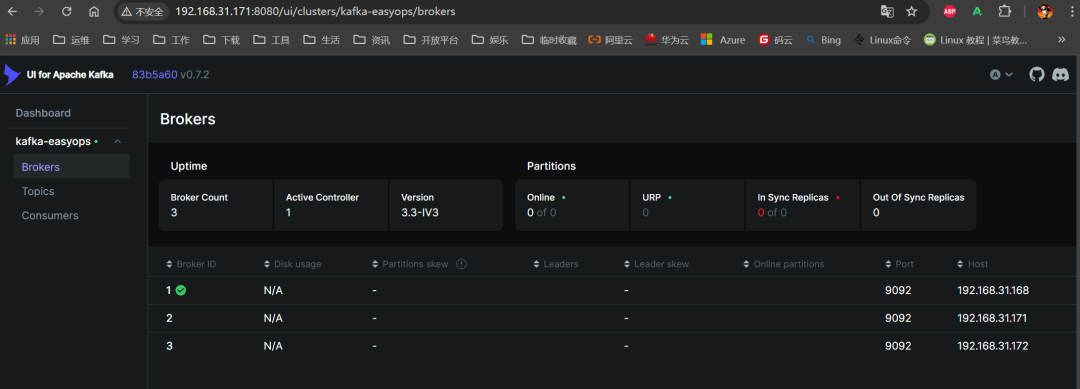
3.4 部署 logstash
-
创建相关目录
$ mkdir /data/logstash/{config,pipelines,logs,data} -p
$ mkdir /data/logstash/pipelines/pipeline_kafka -p
$ cd /data/logstash/
-
编写 docker-compose.yaml
$ cat docker-compose.yaml
version: "3"
services:
  logstash:
    image: docker.elastic.co/logstash/logstash:7.17.22
    container_name: logstash
    # ports:
    #   - 9600:9600
    #   - 5044:5044
    networks:
      - net-logstash
    volumes:
      - $PWD/config/pipelines.yml:/usr/share/logstash/config/pipelines.yml
      - $PWD/config/logstash.yml:/usr/share/logstash/config/logstash.yml
      - $PWD/logs:/usr/share/logstash/logs
      - $PWD/data:/usr/share/logstash/data
      - $PWD/config/ca.crt:/usr/share/logstash/config/ca.crt
      - $PWD/pipelines/pipeline_from_kafka:/usr/share/logstash/pipeline_from_kafka
    environment:
      - TZ=Asia/Shanghai
      - LS_JAVA_OPTS=-Xmx1g -Xms1g
networks:
  net-logstash:
    external: false
$ cp /data/elasticsearch/config/certs/http/ca.crt ./config/ca.crt
3. 创建配置文件
$ vim config/logstash.yml
# https://www.elastic.co/guide/en/logstash/7.17/logstash-settings-file.html
path.logs: /usr/share/logstash/logs
http.host: "0.0.0.0"
xpack.monitoring.enabled: true
xpack.monitoring.elasticsearch.hosts: [
 "https://192.168.31.168:9200",
 "https://192.168.31.171:9200",
 "https://192.168.31.172:9200"
]
xpack.monitoring.elasticsearch.username: logstash_system
xpack.monitoring.elasticsearch.password: 123456
xpack.monitoring.elasticsearch.ssl.verification_mode: none

pipeline.batch.size: 300
pipeline.batch.delay: 50
$ vim config/pipelines.yml
# This file is where you define your pipelines. You can define multiple.
# For more information on multiple pipelines, see the documentation:
#   https://www.elastic.co/guide/en/logstash/current/multiple-pipelines.html

- pipeline.id: kafka
  path.config: "/usr/share/logstash/pipeline_from_kafka"
-
创建 pipeline
pipeline 可先随便写一个,不然会起不来:pipeline_from_kafka/logstash-kafka.conf
注意:每个节点的 client_id 要唯一
input {
  kafka {
    #type => "logs-easyops-kafka"
    # kafka 集群地址
    bootstrap_servers => '192.168.31.168:9092,192.168.31.171:9092,192.168.31.172:9092'
    # 设置分组
    group_id => 'logstash-dev'
    # 多个客户端同时消费需要设置不同的 client_id,注意同一分组的客户端数量≤kafka 分区数量
    client_id => 'logstash-168'
    # 消费线程数
    consumer_threads => 5
    # 正则匹配 topic
    topics_pattern  => "elk_.*"
    #topics => [ "ocp-prod-infra-logs", "ocp-prod-logs", "windows-apps"]
    #默认为 false,只有为 true 的时候才会获取到元数据
    decorate_events => true
    #从最早的偏移量开始消费
    auto_offset_reset => 'earliest'
    #auto_offset_reset => "latest"
    #提交时间间隔
    auto_commit_interval_ms => 1000
    enable_auto_commit => true
    codec => json {
      charset => "UTF-8"
    }
  }
}

filter {
  mutate {
    #从 kafka 的 key 中获取数据并按照"_"切割
    split => ["[@metadata][kafka][topic]", "_"]
    add_field => {
        #将切割后的第一位数据放入自定义的“index”字段中
        "index" => "%{[@metadata][kafka][topic][1]}"
    }
  }

  grok {
    match => { "message" => "%{IPORHOST:remote_addr} - %{DATA:remote_user} \[%{HTTPDATE:time_local}\] \"%{WORD:request_method} %{DATA:uri} HTTP/%{NUMBER:http_version}\" %{NUMBER:response_code} %{NUMBER:body_sent_bytes} \"%{DATA:http_referrer}\" \"%{DATA:http_user_agent}\"" }
  }

  # 通过 date 插件,把 nginx 日志中的时间戳用作 logstash 的 event 时间戳
  date {
    match => [ "time_local", "dd/MMM/yyyy:HH:mm:ss Z" ]
  }

}

output {
  elasticsearch {
    hosts => ["https://192.168.31.168:9200","https://192.168.31.171:9200","https://192.168.31.172:9200"]
    ilm_enabled => false
    user => "elastic"
    password => "123456"
    #使用上面的 index 用作 ES 的索引
    index => "dev-%{index}-%{+YYYY.MM.dd}"
    cacert => "/usr/share/logstash/config/ca.crt"
    ssl => true
    ssl_certificate_verification => false
  }

  # logstash 控制台输出日志和@metadata 信息
  stdout {
      codec => rubydebug {metadata => true}
  }
}
4. 分别启动 logstash
$ docker compose up -d
5. 到 kafka-ui 中查看,可以看到共 15 个消费者(3 个节点每个 5 个线程)

3.5 部署 keepalived
-
安装 keepalived(两个节点都需要)
$ yum install keepalived -y
-
配置 keepalived(两个节点都需要)
主:192.168.31.168
$ cat /etc/keepalived/keepalived.conf
! Configuration File for keepalived
# Master configuration
global_defs {
    notification_email {
        alert@easyops.online
    }
    router_id 1111    # 需要修改,根据 master 或者 bakcup 节点更改
###########################以下只在 master 节点配置################
    script_user root
    #enable_script_security   # 使用非 root 用户执行脚本
###########################以上只在 master 节点配置################
}

###########################以下只在 master 节点配置################

# 自定义检测后端服务语句
vrrp_script check_ngx {
    script "/usr/sbin/pidof haproxy"
    interval  3
    timeout 30
    weight  -10     # 当前节点权重降低数,比如优先级由 100 减到 90
    rise 3
    fall 3
}
###########################以上只在 master 节点配置################

vrrp_instance VI_1 {
    state MASTER
    interface ens33    # 需要修改,网卡名称
    virtual_router_id 111    # 需要修改,虚拟路编号,0-255,依据不同项目更改,主备一致,同一网段唯一
    unicast_src_ip 192.168.31.168  # 需要修改,当前主机 ip 地址
    unicast_peer {
        192.168.31.171   # 需要修改,另外一台 HA 节点 ip
        192.168.31.168
    }
    priority 100      # 需要修改,节点优先级,数字越大优先级越高,主(100)备(98)不同,主备之差必须小于上面 weight 的值
    advert_int 1    # 心跳间隔
    authentication {    # 密钥认证,1-8 位
        auth_type PASS
        auth_pass 1111
    }
    virtual_ipaddress {
        192.168.31.173   # 需要修改,虚拟 ip 地址
    }
###########################以下只在 master 节点配置################

    # 在路由实例中引用自定义脚本
    track_script {
        check_ngx
    }
###########################以上只在 master 节点配置################
}
从:192.168.31.171
$ cat /etc/keepalived/keepalived.conf
! Configuration File for keepalived
# Master configuration
global_defs {
    notification_email {
        alert@easyops.online
    }
    router_id 2222    # 需要修改,根据 master 或者 bakcup 节点更改
###########################以下只在 master 节点配置################
    script_user root
    #enable_script_security   # 使用非 root 用户执行脚本
###########################以上只在 master 节点配置################
}

###########################以下只在 master 节点配置################

# 自定义检测后端服务语句
vrrp_script check_ngx {
    script "/usr/sbin/pidof haproxy"
    interval  3
    timeout 30
    weight  -10     # 当前节点权重降低数,比如优先级由 100 减到 90
    rise 3
    fall 3
}
###########################以上只在 master 节点配置################

vrrp_instance VI_1 {
    state BACKUP
    interface ens33    # 需要修改,网卡名称
    virtual_router_id 111    # 需要修改,虚拟路编号,0-255,依据不同项目更改,主备一致,同一网段唯一
    unicast_src_ip 192.168.31.171  # 需要修改,当前主机 ip 地址
    unicast_peer {
        192.168.31.168   # 需要修改,另外一台 HA 节点 ip
        192.168.31.171
    }
    priority 100      # 需要修改,节点优先级,数字越大优先级越高,主(100)备(98)不同,主备之差必须小于上面 weight 的值
    advert_int 1    # 心跳间隔
    authentication {    # 密钥认证,1-8 位
        auth_type PASS
        auth_pass 1111
    }
    virtual_ipaddress {
        192.168.31.173   # 需要修改,虚拟 ip 地址
    }
###########################以下只在 master 节点配置################

# 在路由实例中引用自定义脚本
    track_script {
        check_ngx
    }
###########################以上只在 master 节点配置################
}
-
启动(两个节点都需要)
$ sudo systemctl start keepalived
$ sudo systemctl enalble keepalived
-
查看 VIP
$ ip -4 a

3.6 部署 haproxy
-
安装(两个节点都需要)
yum 安装的版本一般比较低,建议自己手动编译安装:
$ yum -y install gcc gcc-c++ glibc glibc-devel pcre pcre-devel openssl openssl-devel systemd-devel net-tools vim iotop bc zip unzip zlib-devel lrzsz tree screen lsof tcpdump wget ntpdate readline-devel

$ wget https://www.haproxy.org/download/1.8/src/haproxy-1.8.31.tar.gz
$ tar -zxvf haproxy-1.8.31.tar.gz
$ cd haproxy-1.8.31
$ make clean
$ make -j $(nproc) ARCH=x86_64 TARGET=linux2628 USE_PCRE=1 USE_OPENSSL=1 USE_ZLIB=1 USE_SYSTEMD=1 USE_CPU_AFFINITY=1 PREFIX=/usr/local/haproxy
$make install PREFIX=/usr/local/haproxy

$ cp /usr/local/haproxy/sbin/haproxy  /usr/sbin/

$ useradd -s /sbin/nologin haproxy

$ vim  /usr/lib/systemd/system/haproxy.service
[Unit]
Description=HAProxy Load Balancer
After=syslog.target network.target

[Service]
Type=Forking
#EnvironmentFile=/etc/sysconfig/haproxy
ExecStartPre=/usr/sbin/haproxy -f /etc/haproxy/haproxy.cfg -c -q
ExecStart=/usr/sbin/haproxy -Ws -f /etc/haproxy/haproxy.cfg -p /run/haproxy.pid $OPTIONS
ExecReload=/bin/kill -USR2 $MAINPID
KillMode=mixed

[Install]
WantedBy=multi-user.target
-
配置
$ mkdir /etc/haproxy
$ vim /etc/haproxy/haproxy.cfg
2 台配置一致:
# 全局配置
global
    #开启多进程工作模式
    nbproc 1
    #nbthread 16
    #cpu-map auto:1/1-16 0-15
    # 最大连接数
    maxconn 10000
    # 进程运行用户
    user haproxy
    group haproxy
    # 日志输出,最多设置 2 个
    log 127.0.0.1 local2 info
    # 锁定工作目录(安全)
    chroot  /var/lib/haproxy
    # pid 文件路径
    pidfile /var/run/haproxy.pid
    # ssl 设置
    #ssl-default-bind-ciphersuites TLS_AES_128_GCM_SHA256:TLS_AES_256_GCM_SHA384:TLS_CHACHA20_POLY1305_SHA256
    ssl-default-bind-options no-sslv3 no-tlsv10 no-tlsv11 no-tls-tickets
    #ssl-default-server-ciphersuites TLS_AES_128_GCM_SHA256:TLS_AES_256_GCM_SHA384:TLS_CHACHA20_POLY1305_SHA256
    #ssl-default-server-options no-sslv3 no-tlsv10 no-tlsv11 no-tls-tickets
    tune.ssl.default-dh-param 2048
    # 传输文件大小 10g
    tune.h2.initial-window-size 5048576
    # sock 文件
    stats socket /var/lib/haproxy/stats
    # 以守护进程方式运行
    daemon

# 默认参数配置
defaults
    # http 模式
    mode http
    # 开启与客户端会话保持
    option http-keep-alive
    # 透传客户端真实 IP 到后端服务器
    option forwardfor
    # 当 server id 对应的服务器挂掉,强制定向到其他健康的服务器,重新派发
    option redispatch
    # websocket
    timeout tunnel 1h
    timeout client-fin 30s
    # session 会话保持时间,范围内会转发到相同的后端服务器
    timeout  http-keep-alive 120s
    # 用户请求从 haproxy 到后端 server 的最长连接等待时间 (TCP 握手前)
    timeout connect 600ms
    # 客户请求从 haproxy 到后端 server 的请求处理超时时长(TCP 握手后)
    timeout client 600ms
    # haproxy 与客户端的最长非活动时间
    timeout server 600ms
    # 对后端服务器的默认检测超时时间
    timeout check 5s

# haproxy 状态管理页面配置,可不修改
listen stats
    mode http
    bind :59999
    stats enable
    log global
    stats uri /haproxy-status
    stats auth admin:123456

# http 代理配置
frontend  kibanahttps
    # 指定证书目录,把 key 和 crt 或者合并后的 cer 或者 pem 文件放到该路径下
    bind :443 ssl crt /etc/haproxy/certs alpn h2 ciphers EECDH+ECDSA+AESGCM+AES128:EECDH+ECDSA+CHACHA20:EECDH+ECDSA+AESGCM+AES256:EECDH+ECDSA+AES128+SHA:EECDH+ECDSA+AES256+SHA:EECDH+aRSA+AESGCM+AES128:EECDH+aRSA+CHACHA20:EECDH+aRSA+AESGCM+AES256:EECDH+aRSA+AES128+SHA:EECDH+aRSA+AES256+SHA
    # 访问模式,https 和 http 这里都写 http
    mode http
    # 安全配置
    #http-response set-header X-XSS-Protection "1; mode=block"
    #http-response set-header Strict-Transport-Security "max-age=31536010; includeSubDomains; preload"
    # acl 规则,根据不同域名代理到不同后端服务器
    acl domain_api_ki hdr_beg(host) -i logging.easyops.local
    # kibana
    use_backend kibanaserver if domain_api_ki
    # 默认规则
    default_backend nomatch
    # 打开日志功能
    log global
    # http 相关设置
    option httplog
    option dontlognull
    option http-server-close
    option forwardfor except 127.0.0.0/8
    # 抓取请求和响应的相应值,并配置到 log 中
    capture request header Host len 256
    capture request header User-Agent len 512
    capture request header X-Forwarded-For len 100
    capture request header Referer len 200
    capture response header Server len 40
    capture response header Server-ID len 40
    log-format '[%t] "%ci:%cp" "%si:%sp" "%r" %bi %f %b %B %U %ST "%hrl" "%hsl"'


# http 代理配置
frontend  kafkauihttps
    # 指定证书目录,把 key 和 crt 或者合并后的 cer 或者 pem 文件放到该路径下
    bind :51443 ssl crt /etc/haproxy/certs alpn h2 ciphers EECDH+ECDSA+AESGCM+AES128:EECDH+ECDSA+CHACHA20:EECDH+ECDSA+AESGCM+AES256:EECDH+ECDSA+AES128+SHA:EECDH+ECDSA+AES256+SHA:EECDH+aRSA+AESGCM+AES128:EECDH+aRSA+CHACHA20:EECDH+aRSA+AESGCM+AES256:EECDH+aRSA+AES128+SHA:EECDH+aRSA+AES256+SHA
    # 访问模式,https 和 http 这里都写 http
    mode http
    # 安全配置
    #http-response set-header X-XSS-Protection "1; mode=block"
    #http-response set-header Strict-Transport-Security "max-age=31536010; includeSubDomains; preload"
    # acl 规则,根据不同域名代理到不同后端服务器
    acl domain_api_ka hdr_beg(host) -i logging.easyops.local
    # kafka
    use_backend kafkaui if domain_api_ka
    # 默认规则
    default_backend nomatch

    # 打开日志功能
    log global
    # http 相关设置
    option httplog
    option dontlognull
    option http-server-close
    option forwardfor except 127.0.0.0/8
    # 抓取请求和响应的相应值,并配置到 log 中
    capture request header Host len 256
    capture request header User-Agent len 512
    capture request header X-Forwarded-For len 100
    capture request header Referer len 200
    capture response header Server len 40
    capture response header Server-ID len 40
    log-format '[%t] "%ci:%cp" "%si:%sp" "%r" %bi %f %b %B %U %ST "%hrl" "%hsl"'

backend kibanaserver
    # 白名单配置
    #tcp-request content accept if { src -f /etc/haproxy/lists/apiwhitelist_kibana }
    #tcp-request content reject
    balance source
    mode http
    # 后端服务如果本身是 https,就要加上 ssl verify none
    server kibana1 192.168.31.168:5601 check inter 6000 rise 2 fall 3
    server kibana2 192.168.31.171:5601 check inter 6000 rise 2 fall 3

backend kafkaui
    # 白名单配置
    #tcp-request content accept if { src -f /etc/haproxy/lists/apiwhitelist_kafkaui }
    #tcp-request content reject
    balance source
    mode http
    #http-request replace-path /kafka[/]?(.*) /\1
    server kafkaui1 192.168.31.168:8080 check inter 6000 rise 2 fall 3
    server kafkaui2 192.168.31.171:8080 check inter 6000 rise 2 fall 3

# default
backend nomatch
    mode http
    http-request deny deny_status 403
-
创建证书(两个节点都需要)
$ mkdir /etc/haproxy/certs
$ cd /etc/haproxy/certs
$ cat /data/kibana/certs/server.crt /data/kibana/certs/server.key > server.pem
4. 设置 selinux(两个节点都需要)
$ setsebool -P haproxy_connect_any 1
-
测试配置文件是否正确并启动 haproxy(两个节点都需要)
$ haproxy -c -f /etc/haproxy/haproxy.cfg
$ systemctl start haproxy
$ systemctl enable haproxy
-
开放防火墙端口(两个节点都需要)
$ firewall-cmd --add-port=443/tcp --permanent
$ firewall-cmd --add-port=51443/tcp --permanent
$ firewall-cmd --reload
$ firewall-cmd --list-all
3.7 访问测试
-
将域名解析到 VIP:192.168.31.173
192.168.31.173 logging.easyops.local
-
测试 kibana
https://logging.easyops.local
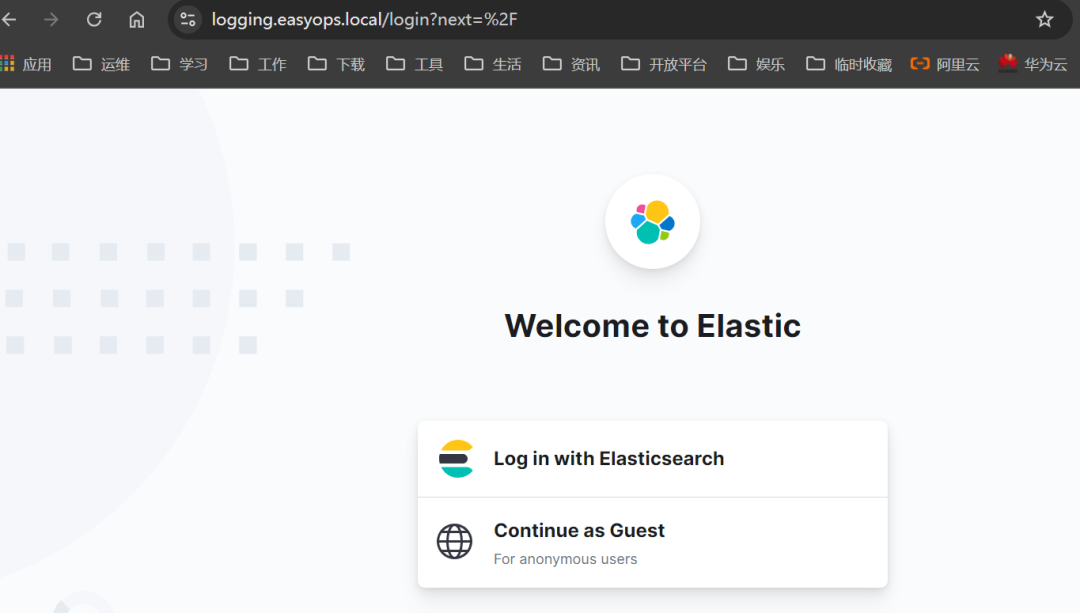
-
测试 kafka-ui
https://logging.easyops.local:51443
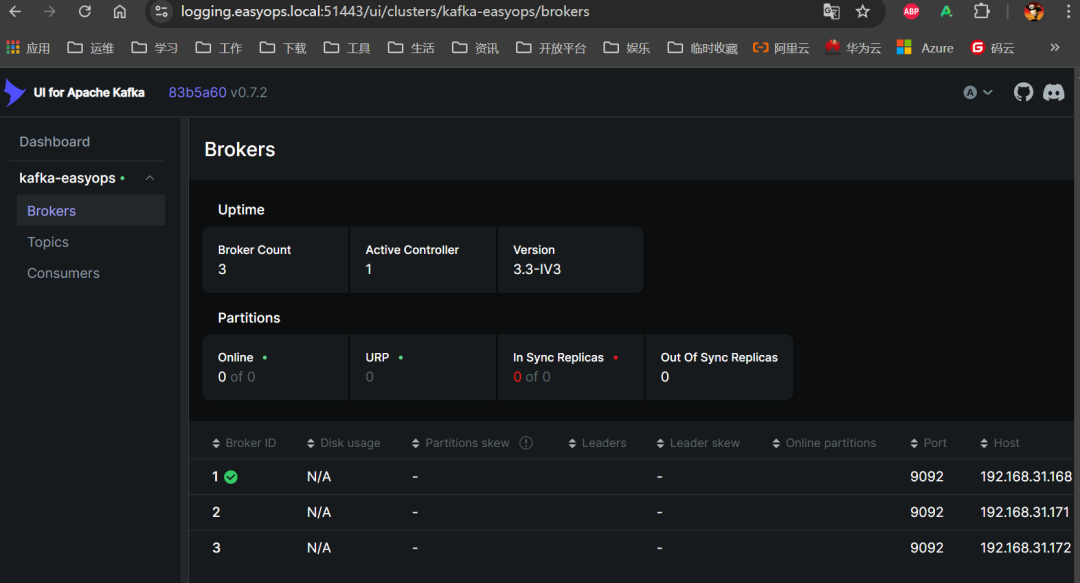
四、日志采集示例
4.1 采集 nexus 日志
-
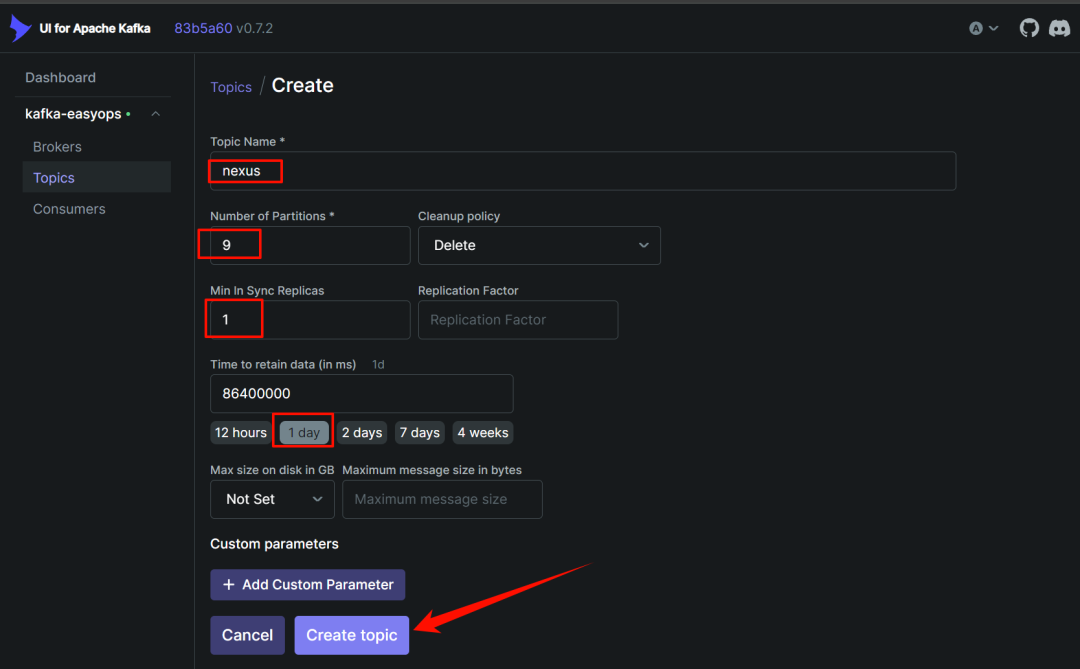
到 kafka-ui 中创建一个名为 nexus 的 topic,分区数根据自己服务器配置定义,副本数一般来说 1 个就够了,就是一个集群中保留两份。
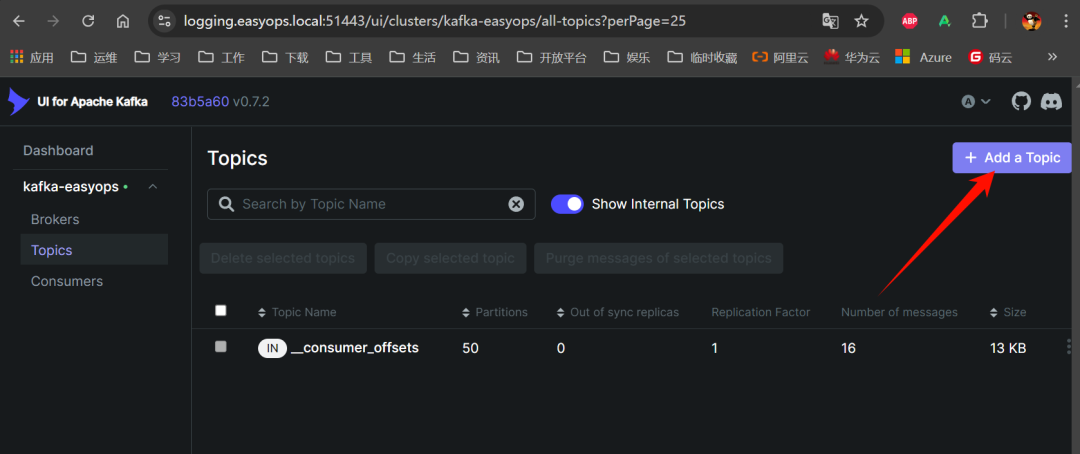

-
查看 nexus 日志格式
request.log:
192.168.31.188 - - [07/Aug/2024:08:24:40 +0800] "GET / HTTP/1.0" 200 - 7927 1 "Blackbox Exporter/0.24.0" [qtp1081146768-38160]
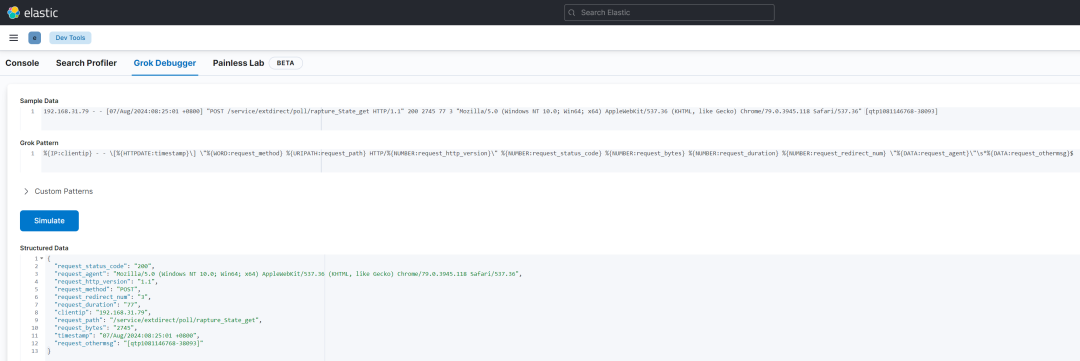
192.168.31.79 - - [07/Aug/2024:08:25:01 +0800] "POST /service/extdirect/poll/rapture_State_get HTTP/1.1" 200 2745 77 3 "Mozilla/5.0 (Windows NT 10.0; Win64; x64) AppleWebKit/537.36 (KHTML, like Gecko) Chrome/79.0.3945.118 Safari/537.36" [qtp1081146768-38093]
outbound-request.log:
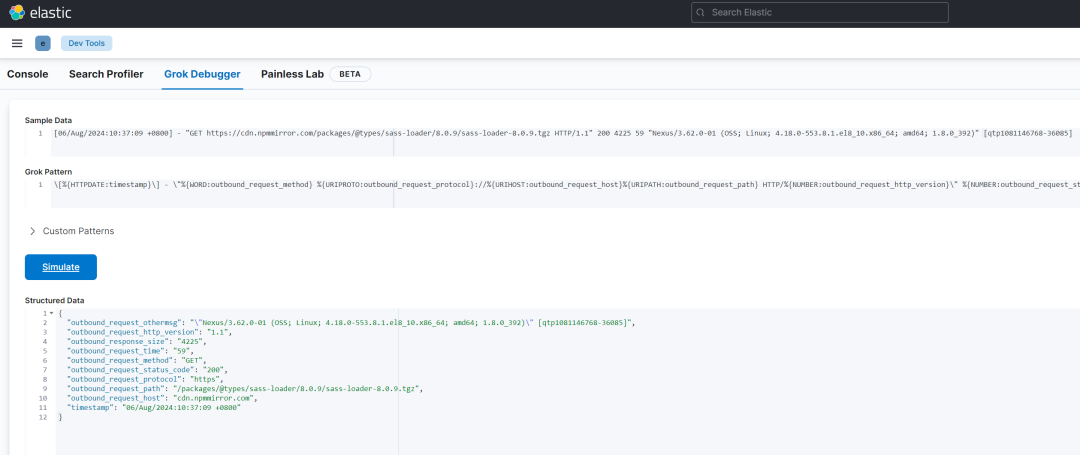
[06/Aug/2024:10:37:09 +0800] - "GET https://cdn.npmmirror.com/packages/@types/sass-loader/8.0.9/sass-loader-8.0.9.tgz HTTP/1.1" 200 4225 59 "Nexus/3.62.0-01 (OSS; Linux; 4.18.0-553.8.1.el8_10.x86_64; amd64; 1.8.0_392)" [qtp1081146768-36085]
[06/Aug/2024:10:56:45 +0800] - "GET https://pypi.tuna.tsinghua.edu.cn/simple/subscription-manager/ HTTP/1.1" 404 -1 206 "Nexus/3.62.0-01 (OSS; Linux; 4.18.0-553.8.1.el8_10.x86_64; amd64; 1.8.0_392)" [qtp1081146768-36115]
-
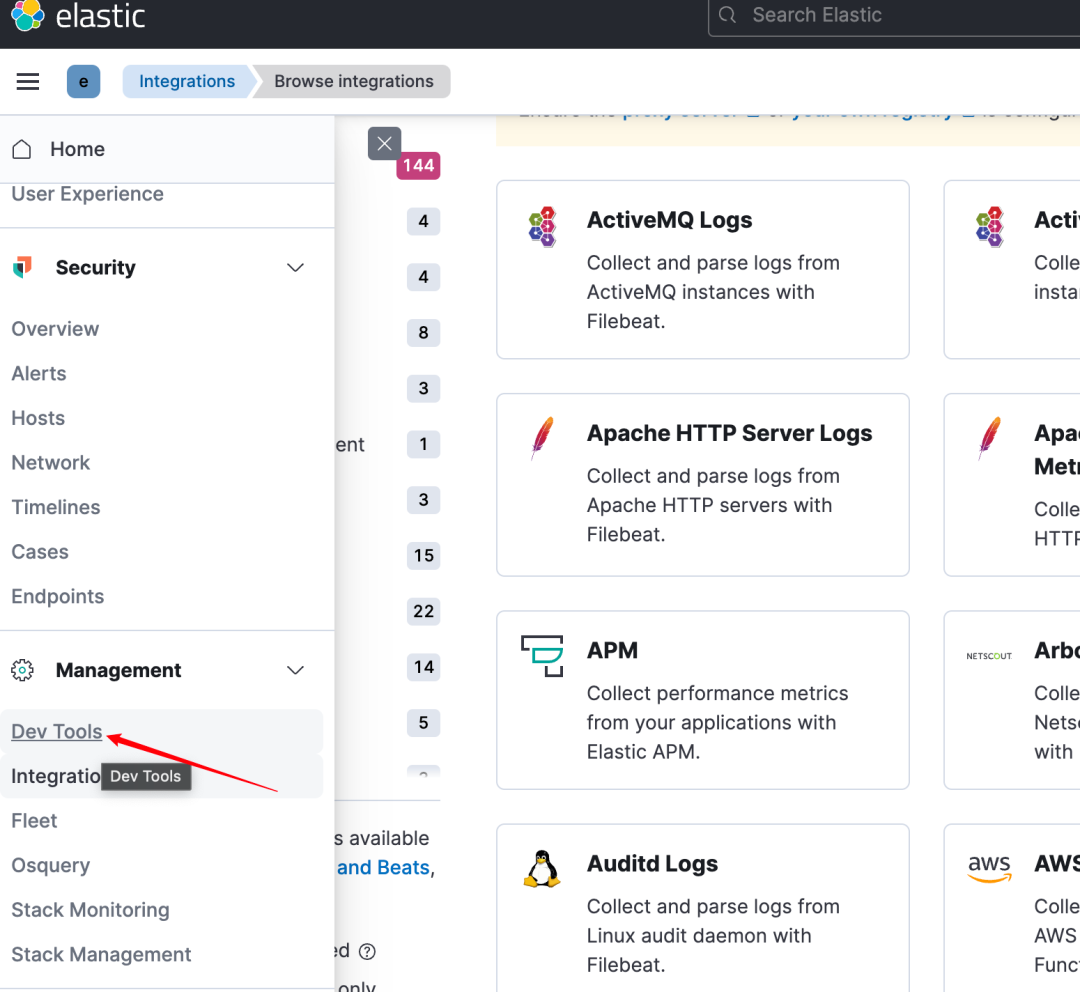
编写正则匹配日志格式,这里可以使用 kibana 中自带的 dev tools 中的 grok debugger 进行匹配验证
验证成功后修改 logstash 中 pipeline 的匹配规则:
$ vim pipeline/pipeline_from_kafka/logstash.conf
input {
  kafka {
    #type => "logs-easyops-kafka"
    # kafka 集群地址
    bootstrap_servers => '192.168.31.168:9092,192.168.31.171:9092,192.168.31.172:9092'
    # 设置分组
    group_id => 'logstash-dev'
    # 多个客户端同时消费需要设置不同的 client_id,注意同一分组的客户端数量≤kafka 分区数量
    client_id => 'logstash-168'
    # 消费线程数
    consumer_threads => 5
    # 正则匹配 topic
    #topics_pattern  => "elk_.*"
    # 指定具体的 topic
    topics => [ "nexus"]
    #默认为 false,只有为 true 的时候才会获取到元数据
    decorate_events => true
    #从最早的偏移量开始消费
    auto_offset_reset => 'earliest'
    #auto_offset_reset => "latest"
    #提交时间间隔
    auto_commit_interval_ms => 1000
    enable_auto_commit => true
    codec => json {
      charset => "UTF-8"
    }
  }
}

filter {
    if [log][file][path] == "/usr/share/filebeat/nexus-logs/outbound-request.log" {
        grok {
            match => {
                "message" => "\[%{HTTPDATE:timestamp}\] - \"%{WORD:outbound_request_method} %{URIPROTO:outbound_request_protocol}://%{URIHOST:outbound_request_host}%{URIPATH:outbound_request_path} HTTP/%{NUMBER:outbound_request_http_version}\" %{NUMBER:outbound_request_status_code} %{NUMBER:outbound_response_size} %{NUMBER:outbound_request_time}\s*%{DATA:outbound_request_othermsg}$"
            }
        }

        mutate {
            remove_field => [ "message" ]
        }
    } else if [log][file][path] == "/usr/share/filebeat/nexus-logs/request.log" {
        grok {
            match => {
                "message" => "%{IP:clientip} - - \[%{HTTPDATE:timestamp}\] \"%{WORD:request_method} %{URIPATH:request_path} HTTP/%{NUMBER:request_http_version}\" %{NUMBER:request_status_code} %{NUMBER:request_bytes} %{NUMBER:request_duration} %{NUMBER:request_redirect_num} \"%{DATA:request_agent}\"\s*%{DATA:request_othermsg}$"
            }
        }
        mutate {
            remove_field => [ "message" ]
        }
    }

    mutate {
      add_field => { "logstash_source" => "${HOSTNAME}" }
    }
}

output {
    if [fields][app] == "nexus" {
        elasticsearch {
            hosts => ["https://192.168.31.168:9200","https://192.168.31.171:9200","https://192.168.31.172:9200"]
            ilm_enabled => false
            user => "elastic"
            password => "123456"
            index => "nexus-%{+YYYY.MM.dd}"
            cacert => "/usr/share/logstash/config/ca.crt"
            ssl => true
            ssl_certificate_verification => false
        }
    }
}
$ docker restart logstash
重启下 logstash(注意 3 台都要修改重启):
$ docker restart logstash
-
到 nexus 服务器中部署 filebeat
1)创建相关目录并编写 filebeat 的 dockerfile
$ mkdir /data/filebeat/{conf,logs} -p
$ cd /data/filebeat
$ chown -R 1000:1000 logs
$ cat docker-compose.yaml
version: '3'
services:
  filebeat:
    image: hub.easyops.online/elk/filebeat:7.17.22
    container_name: filebeat
    restart: always
    #user: root
    volumes:
      - $PWD/conf/filebeat.yml:/usr/share/filebeat/filebeat.yml
      - $PWD/logs:/usr/share/filebeat/logs
      - /data/nexus/nexus3-data/log:/usr/share/filebeat/nexus-logs
    command: filebeat -c /usr/share/filebeat/filebeat.yml --path.logs /usr/share/filebeat/logs
    environment:
      - TZ=Asia/Shanghai
    networks:
      - filebeat
networks:
  filebeat:
    external: false
/data/nexus/nexus3-data/log 是 neuxs 的日志目录
2)编写配置文件 filebeat.yml
$ cat conf/filebeat.yml | egrep -v "#|^$"
filebeat.inputs:
  - type: filestream
    id: nexus-logs
    enabled: true
    paths:
      - /usr/share/filebeat/nexus-logs/*.log
      - /usr/share/filebeat/nexus-logs/audit/*.log
    ignore_older: 720h
    fields:
      log_source: linux-apps
      app: nexus
      zone: internal
      env: prod
filebeat.config.modules:
  path: ${path.config}/modules.d/*.yml
  reload.enabled: false
setup.kibana:
output.kafka:
  hosts: ["192.168.31.168:9092", "192.168.31.171:9092", "1192.168.31.172:9092"]
  topic: nexus
  compression: gzip
  max_message_bytes: 100000000
  partition.round_robin:
    reachable_only: true
processors:
  - add_host_metadata:
      when.not.contains.tags: forwarded
  - add_cloud_metadata: ~
  - add_docker_metadata: ~
  - add_kubernetes_metadata: ~
logging.level: info
logging.to_files: true
logging.files:
  path: /usr/share/filebeat/logs
  name: filebeat.log
  keepfiles: 7
  permissions: 0644
  rotateeverybytes: 104857600
queue.mem:
  events: 4096
  flush.min_events: 512
  flush.timeout: 3s
3)启动 filebeat
$ docker compose up -d
-
到 kafka-ui 中查看对应的 topic 中是否有数据过来
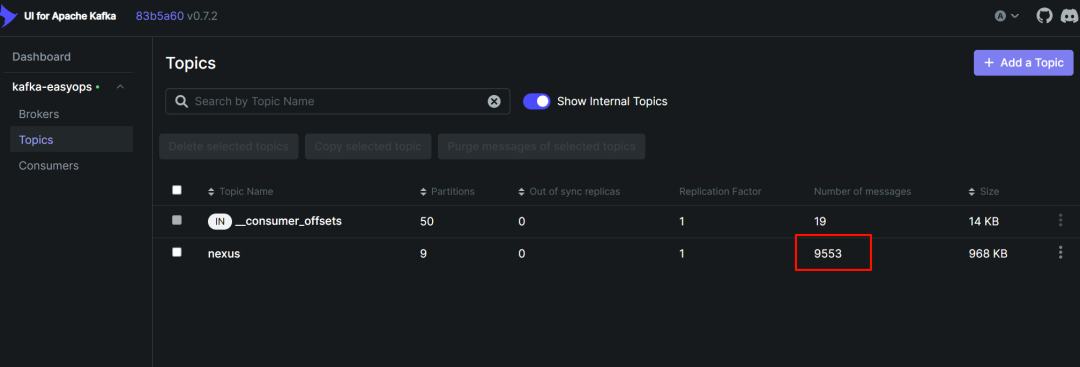
-
到 kibana 中的索引管理中查看是否有创建对应的 index
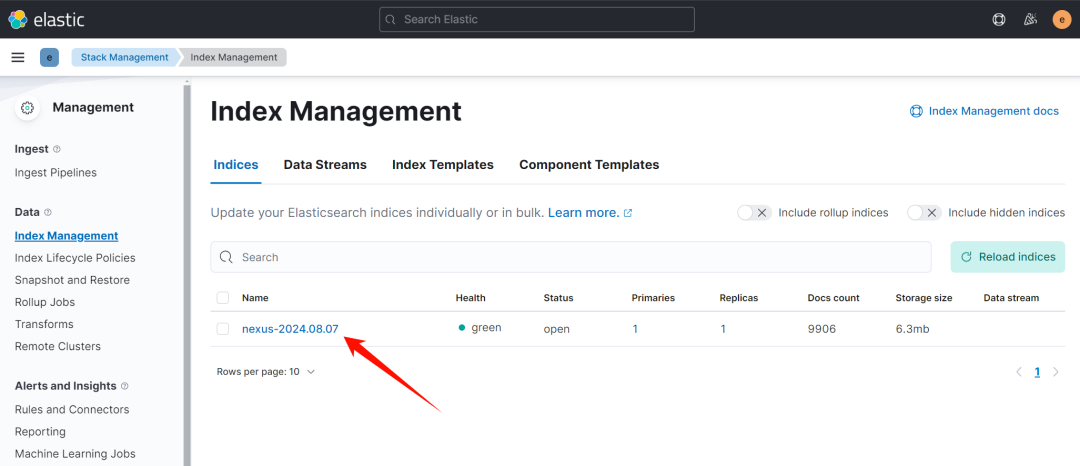
-
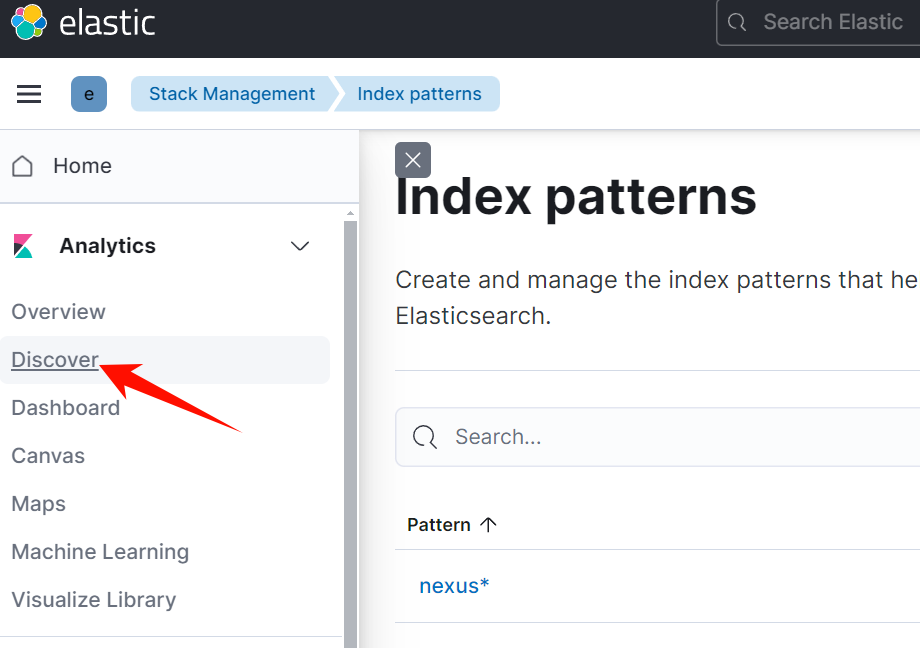
创建 index pattern

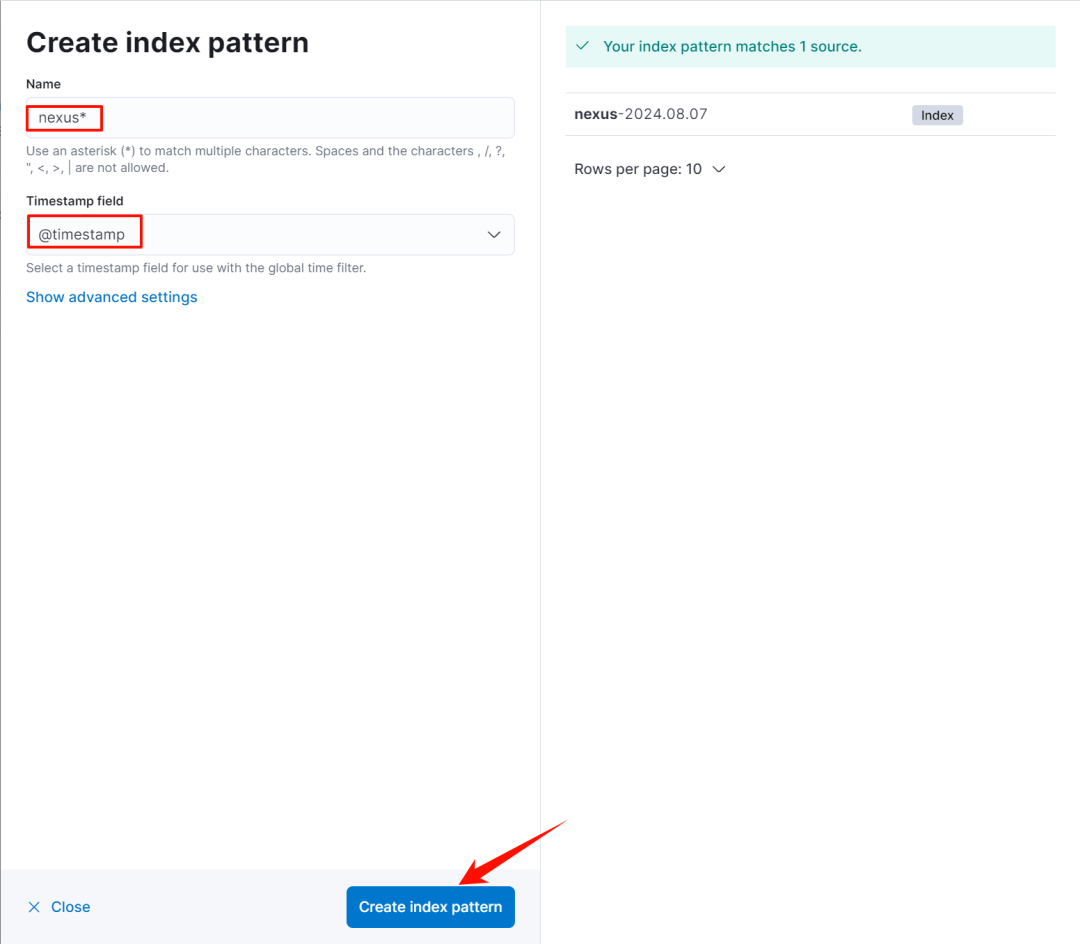
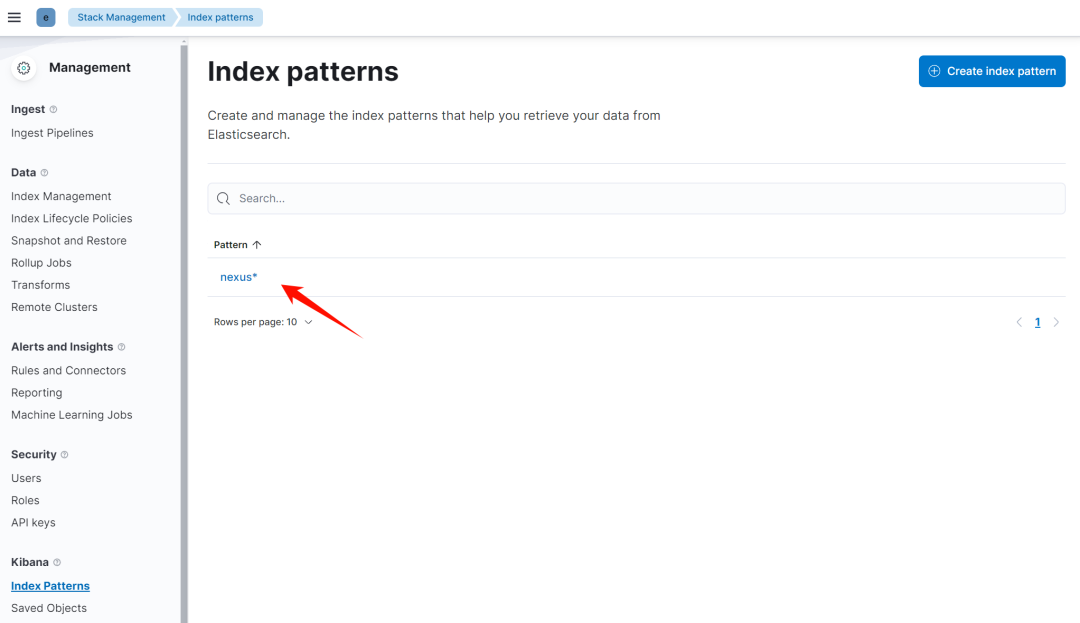
-
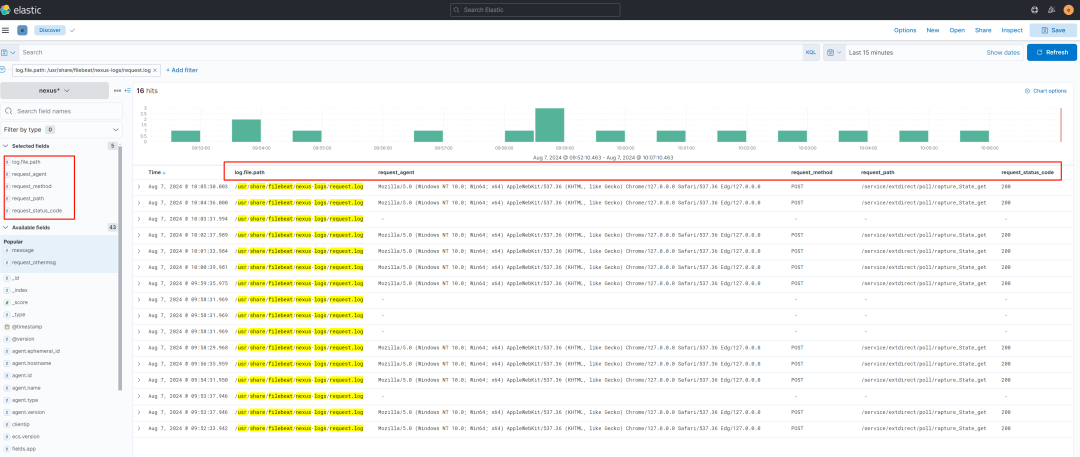
到 discovery 中查看检索日志
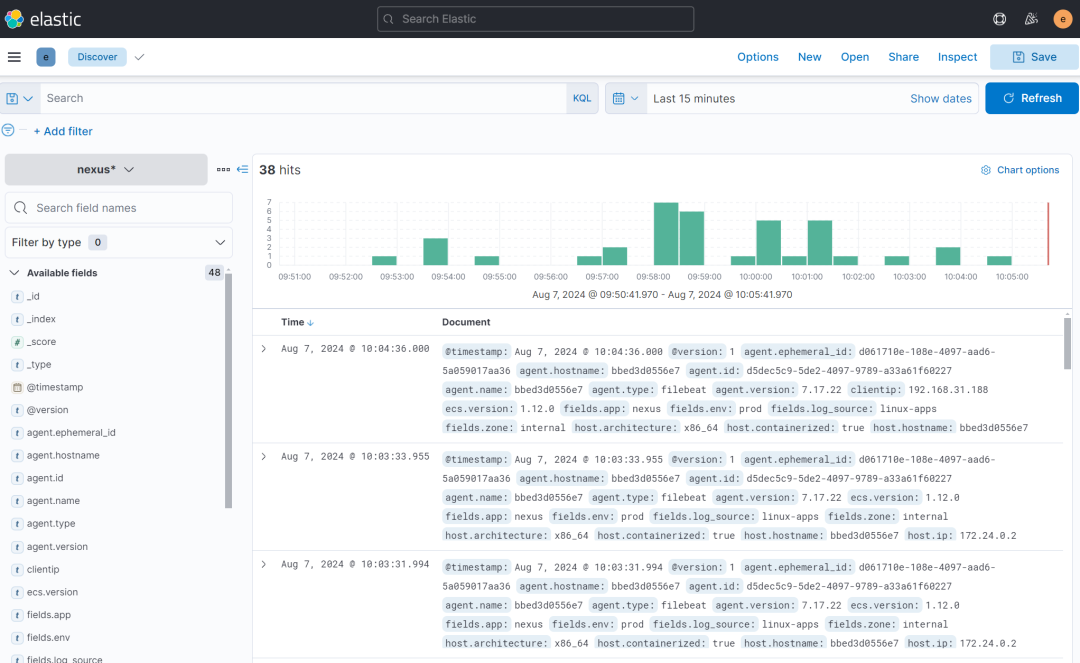
可以看到相关字段已经正确匹配出来:

4.2 采集操作系统日志
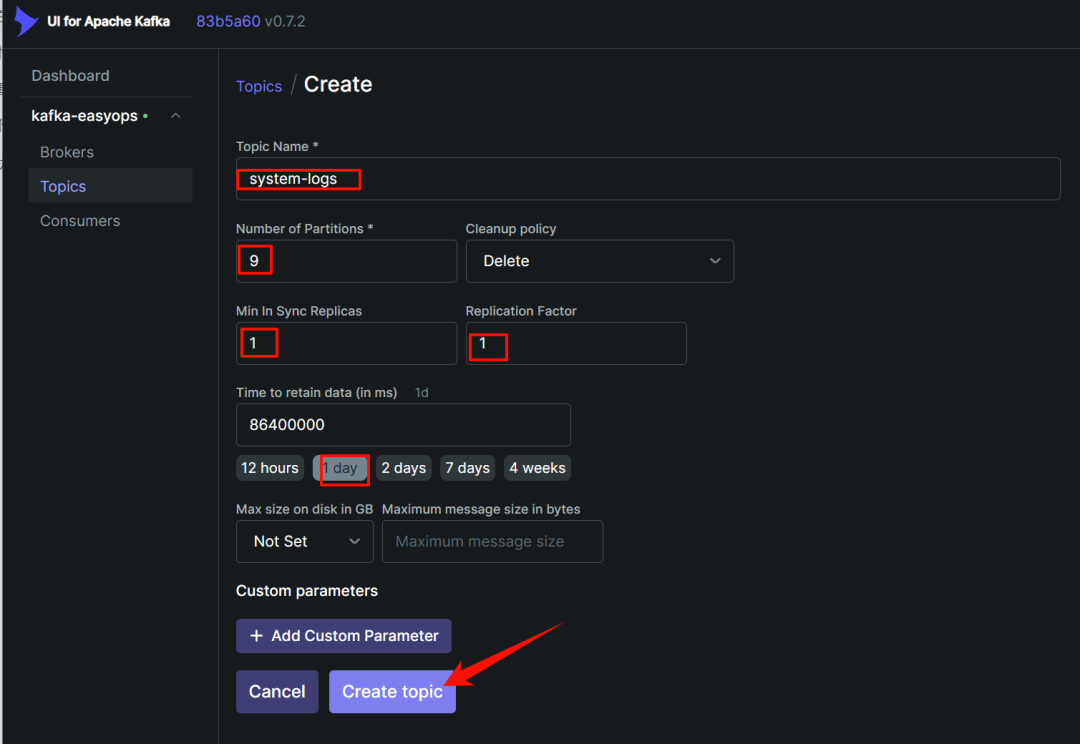
-
在 kafka-ui 中添加一个 topic 用于存放系统日志

-
在需要采集日志的服务器中部署 filebeat
1) 下载安装
$ wget https://artifacts.elastic.co/downloads/beats/filebeat/filebeat-7.17.22-x86_64.rpm
$ rpm -ivh filebeat-7.17.22-x86_64.rpm
2)修改配置文件
$ cat /etc/filebeat/filebeat.yml |egrep -v "#|^$"
filebeat.inputs:
- type: filestream
  id: linux-centos79
  enabled: true
  paths:
    - /var/log/messages
    - /var/log/secure*
    - /var/log/*.log
  fields:
    type: system_log
    origin_home: centos79
    log_topic: system-logs
filebeat.config.modules:
  path: ${path.config}/modules.d/*.yml
  reload.enabled: false
setup.template.settings:
  index.number_of_shards: 1
setup.kibana:
output.kafka:
  hosts: ["192.168.31.168:9092", "192.168.31.171:9092", "1192.168.31.172:9092"]
  topic: '%{[fields.log_topic]}'
  partition.round_robin:
    reachable_only: false
  required_acks: 1
  compression: gzip
  max_message_bytes: 1000000

logging.level: info
logging.to_files: true
logging.files:
  path: /var/log/filebeat
  name: filebeat.log
  keepfiles: 7
  permissions: 0644
  rotateeverybytes: 104857600

processors:
  - add_host_metadata:
      when.not.contains.tags: forwarded
  - add_cloud_metadata: ~
  - add_docker_metadata: ~
  - add_kubernetes_metadata: ~
3)启动
$ systemctl start filebeat --now
$ systemctl status filebeat
-
查看 kafka 中是否有数据过来

-
修改 logstash 配置并重启 logstash 服务
$ vim pipeline/pipeline_from_kafka/logstash.conf
input {
  kafka {
    #type => "logs-easyops-kafka"
    # kafka 集群地址
    bootstrap_servers => '192.168.31.168:9092,192.168.31.171:9092,192.168.31.172:9092'
    # 设置分组
    group_id => 'logstash-dev'
    # 多个客户端同时消费需要设置不同的 client_id,注意同一分组的客户端数量≤kafka 分区数量
    client_id => 'logstash-168'
    # 消费线程数
    consumer_threads => 5
    # 正则匹配 topic
    #topics_pattern  => "elk_.*"
    # 指定具体的 topic
    topics => [ "nexus","system-logs"]
    #默认为 false,只有为 true 的时候才会获取到元数据
    decorate_events => true
    #从最早的偏移量开始消费
    auto_offset_reset => 'earliest'
    #auto_offset_reset => "latest"
    #提交时间间隔
    auto_commit_interval_ms => 1000
    enable_auto_commit => true
    codec => json {
      charset => "UTF-8"
    }
  }
}

filter {
    if [log][file][path] == "/usr/share/filebeat/nexus-logs/outbound-request.log" {
        grok {
            match => {
                "message" => "\[%{HTTPDATE:timestamp}\] - \"%{WORD:outbound_request_method} %{URIPROTO:outbound_request_protocol}://%{URIHOST:outbound_request_host}%{URIPATH:outbound_request_path} HTTP/%{NUMBER:outbound_request_http_version}\" %{NUMBER:outbound_request_status_code} %{NUMBER:outbound_response_size} %{NUMBER:outbound_request_time}\s*%{DATA:outbound_request_othermsg}$"
            }
        }

        mutate {
            remove_field => [ "message" ]
        }
    } else if [log][file][path] == "/usr/share/filebeat/nexus-logs/request.log" {
        grok {
            match => {
                "message" => "%{IP:clientip} - - \[%{HTTPDATE:timestamp}\] \"%{WORD:request_method} %{URIPATH:request_path} HTTP/%{NUMBER:request_http_version}\" %{NUMBER:request_status_code} %{NUMBER:request_bytes} %{NUMBER:request_duration} %{NUMBER:request_redirect_num} \"%{DATA:request_agent}\"\s*%{DATA:request_othermsg}$"
            }
        }
        mutate {
            remove_field => [ "message" ]
        }
    }

    mutate {
      add_field => { "logstash_source" => "${HOSTNAME}" }
    }
}

output {
    if [fields][app] == "nexus" {
        elasticsearch {
            hosts => ["https://192.168.31.168:9200","https://192.168.31.171:9200","https://192.168.31.172:9200"]
            ilm_enabled => false
            user => "elastic"
            password => "123456"
            index => "nexus-%{+YYYY.MM.dd}"
            cacert => "/usr/share/logstash/config/ca.crt"
            ssl => true
            ssl_certificate_verification => false
        }
    } else if [@metadata][kafka][topic] == "system-logs" {
        elasticsearch {
            hosts => ["https://192.168.31.168:9200","https://192.168.31.171:9200","https://192.168.31.172:9200"]
            ilm_enabled => false
            user => "elastic"
            password => "123456"
            cacert => "/usr/share/logstash/config/ca.crt"
            ssl => true
            ssl_certificate_verification => false
            index => "system-logs-%{+YYYY.MM.dd}"
        }
   }
}
$ docker restart logstash
主要是 output增加新的 system-logs 判断,这里是通过 topic 来判断的。注意 3 个节点都需要修改并重启,嫌麻烦可以通过 ansible-playbook 来批量修改
-
es 查看索引
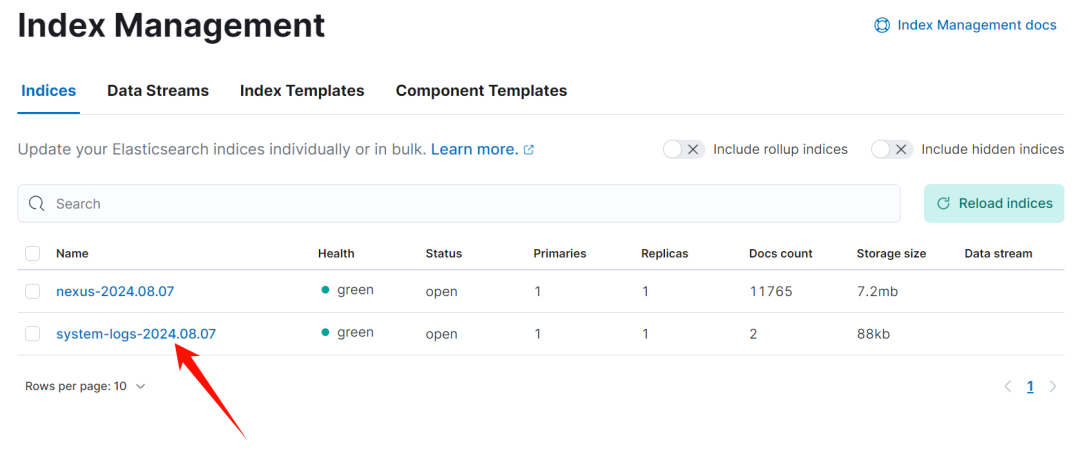
-
创建 index pattern
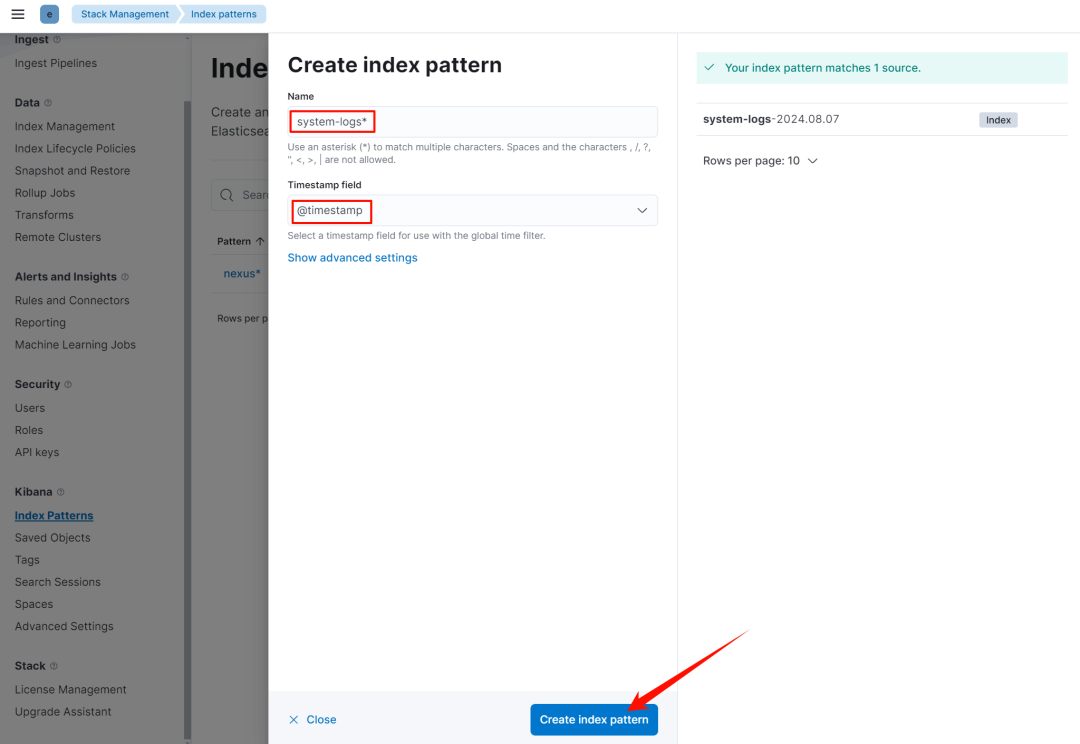
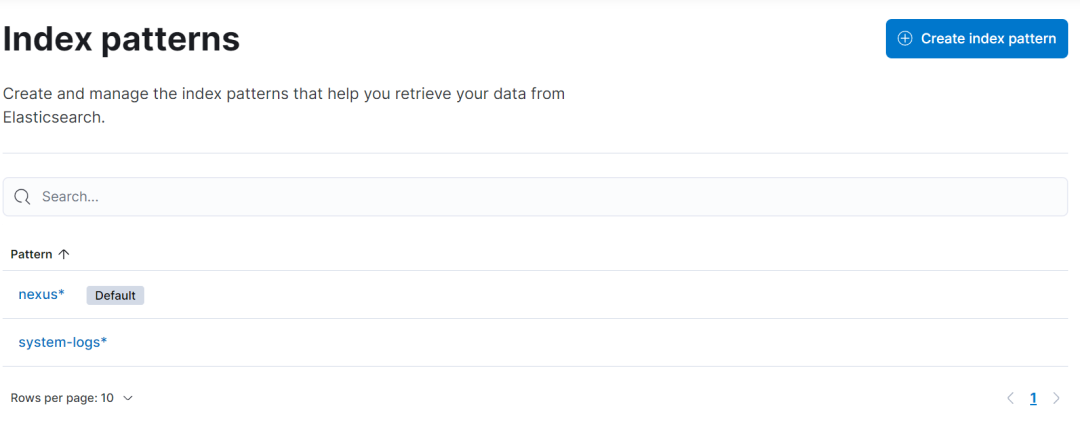
-
discovery 中查看
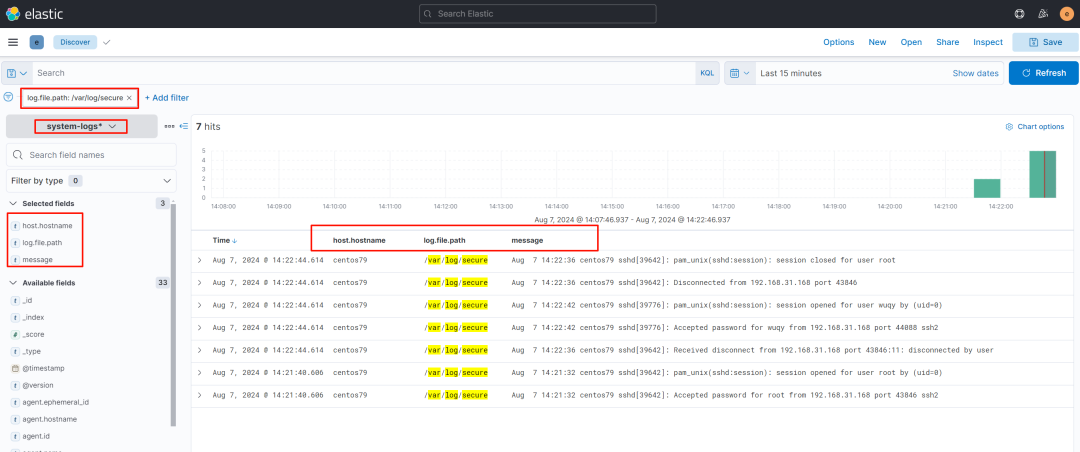
4.3 采集 nginx 访问日志
-
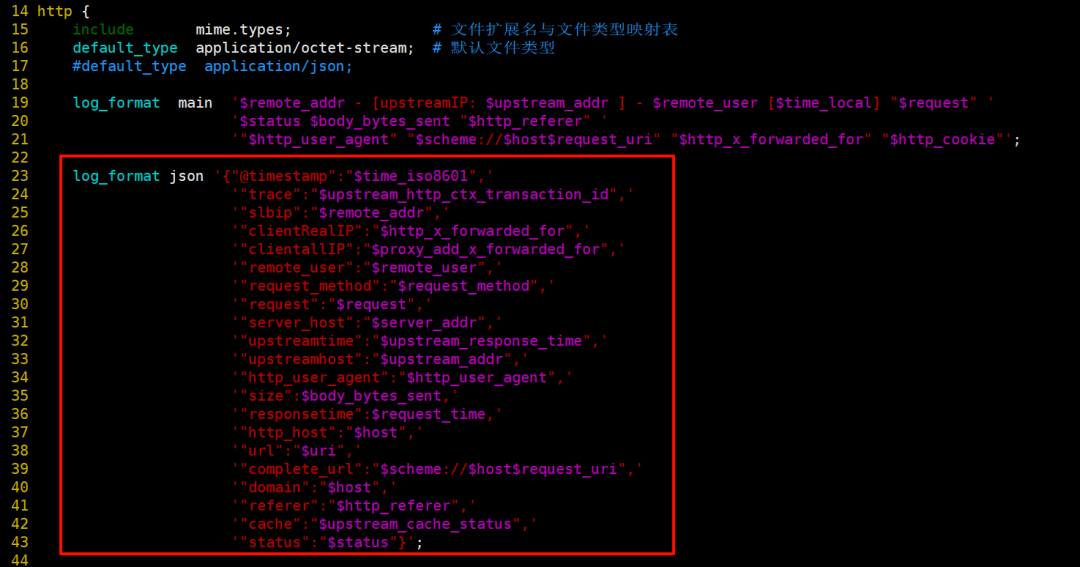
nginx 主配置文件中新增一个 json 格式
-
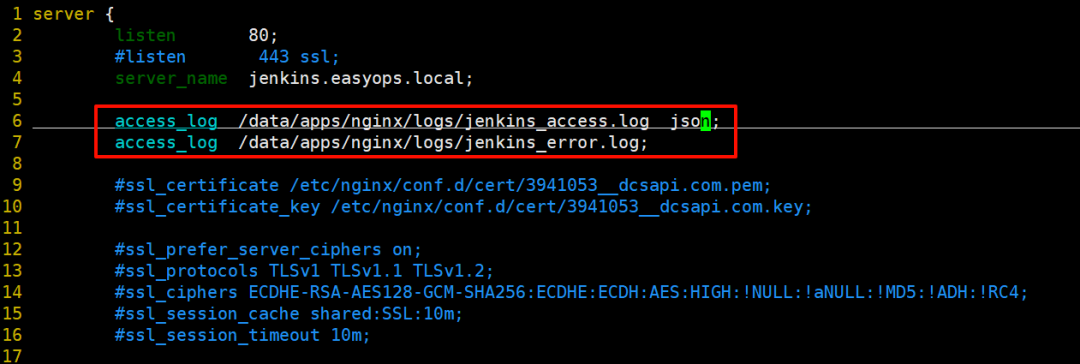
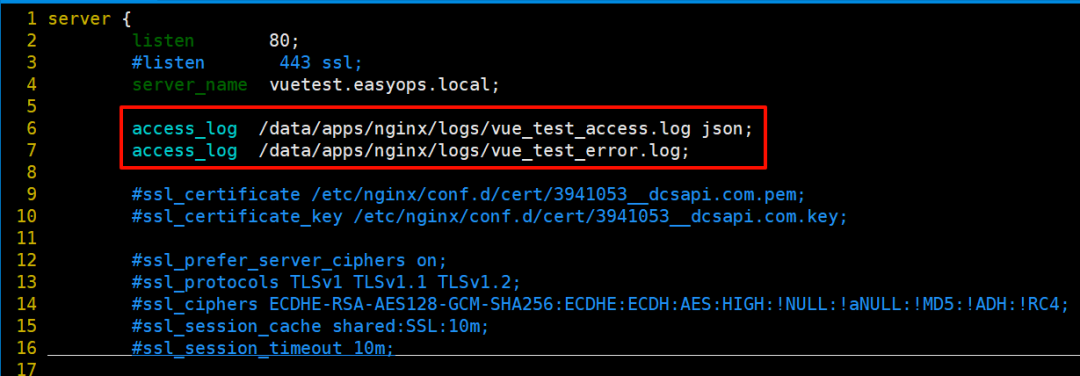
不同的虚拟主机配置好 accesslog 和 errorlog
-
创建相关目录重载 nginx 后查看是否生成日志文件
$ mkdir -p  /data/apps/nginx/logs
$ chown -R nginx:nginx /data/apps/nginx/logs
$ nginx -t
$ nginx -s reload
$ ls -lh /data/apps/nginx/logs

-
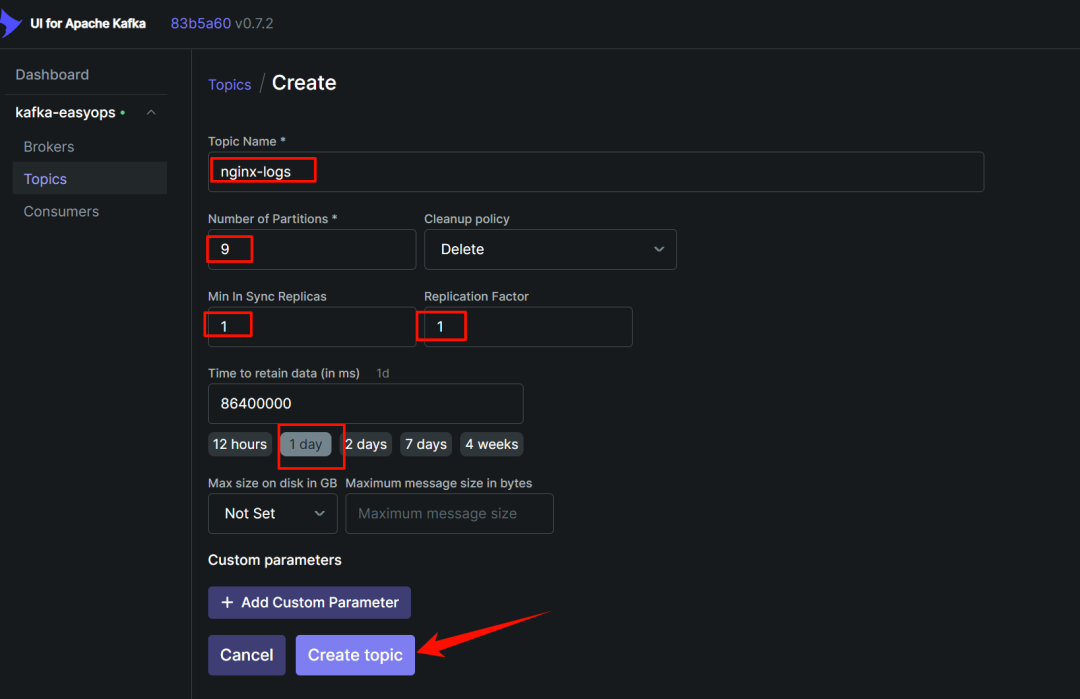
在 kafka-ui 中新建一个 topic,用于存放 nginx 日志

-
部署 filebeat
1)下载安装
$ mkdir -p  /data/apps/nginx/logs
$ chown -R nginx:nginx /data/apps/nginx/logs
$ nginx -t
$ nginx -s reload
$ ls -lh /data/apps/nginx/logs
2)配置
$ cat /etc/filebeat/filebeat.yml |egrep -v "#|^$"
name: "192.168.31.79"

tags: ["192.168.31.79","nginx"]

filebeat.inputs:
- type: log
  id: centos79
  enabled: true
  paths:
    - /data/nginx/logs/*_access.log
    - /data/nginx/logs/*_error.log
  fields:
    env: test
    nginx_log_type: access
    log_topic: nginx-logs
  #将字段直接放置在文档的根级别,而不是将它们嵌套在一个特定的字段(如 fields )中
  fields_under_root: true
  json.keys_under_root: true
  json.overwrite_keys: true
  json.add_error_key: true

- type: log
  id: centos79
  enabled: true
  paths:
    - /data/nginx/logs/*_error.log
  fields:
    env: test
    nginx_log_type: error
    log_topic: nginx-logs
  #将字段直接放置在文档的根级别,而不是将它们嵌套在一个特定的字段(如 fields )中
  fields_under_root: true
  json.keys_under_root: true
  json.overwrite_keys: true
  json.add_error_key: true

# 没有新日志采集后多长时间关闭文件句柄,默认 5 分钟,设置成 1 分钟,加快文件句柄关闭
close_inactive: 1m

# 传输了 3h 后没有传输完成的话就强行关闭文件句柄,这个配置项是解决以上案例问题的 key point
close_timeout: 3h

# 这个配置项也应该配置上,默认值是 0 表示不清理,不清理的意思是采集过的文件描述在 registry 文件里永不清理,在运行一段时间后,registry 会变大,可能会带来问题
clean_inactive: 72h

# 设置了 clean_inactive 后就需要设置 ignore_older,且要保证 ignore_older < clean_inactive
ignore_older: 70h

# 限制 CPU 和内存资源
max_procs: 1 # 限制一个 CPU 核心,避免过多抢占业务资源
queue.mem.events: 512 # 存储于内存队列的事件数,排队发送 (默认 4096)
queue.mem.flush.min_events: 512 # 小于 queue.mem.events ,增加此值可提高吞吐量 (默认值 2048)

filebeat.config.modules:
  path: ${path.config}/modules.d/*.yml
  reload.enabled: false
setup.template.settings:
  index.number_of_shards: 1

setup.kibana:

output.kafka:
  hosts: ["192.168.31.168:9092", "192.168.31.171:9092", "1192.168.31.172:9092"]
  # 因为前面配置了将字段直接放置在文档的根级别,所以这里直接写字段名就行,不需要写加上 fileds 了
  topic: '%{[log_topic]}'
  partition.round_robin:
    reachable_only: false
  required_acks: 1
  compression: gzip
  max_message_bytes: 1000000

logging.level: info
logging.to_files: true
logging.files:
  path: /var/log/filebeat
  name: filebeat.log
  keepfiles: 7
  permissions: 0644
  rotateeverybytes: 104857600

processors:
  - add_host_metadata:
      when.not.contains.tags: forwarded
  - add_cloud_metadata: ~
  - add_docker_metadata: ~
  - add_kubernetes_metadata: ~
3)启动
$ systemctl start filebeat --now
-
查看数据是否到达 kafka

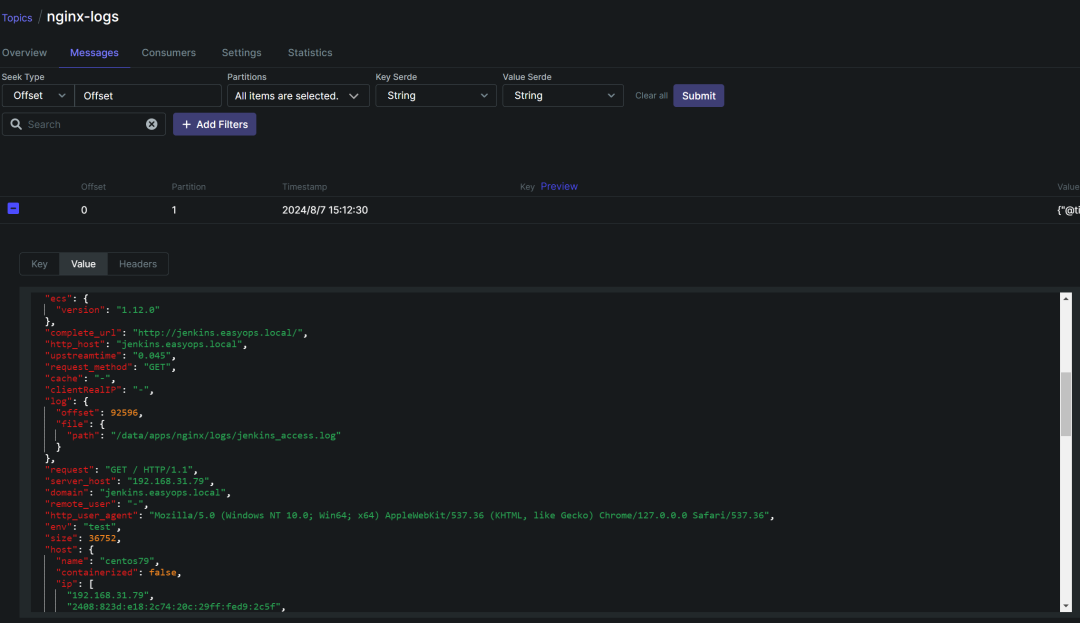
可以看到这里已经自动将字段进行解析了
-
配置 logstash
$ vim pipeline/pipeline_from_kafka/logstash.conf
input {
  kafka {
    #type => "logs-easyops-kafka"
    # kafka 集群地址
    bootstrap_servers => '192.168.31.168:9092,192.168.31.171:9092,192.168.31.172:9092'
    # 设置分组
    group_id => 'logstash-dev'
    # 多个客户端同时消费需要设置不同的 client_id,注意同一分组的客户端数量≤kafka 分区数量
    client_id => 'logstash-168'
    # 消费线程数
    consumer_threads => 5
    # 正则匹配 topic
    #topics_pattern  => "elk_.*"
    # 指定具体的 topic
    topics => [ "nexus","system-logs", "nginx-logs"]
    #默认为 false,只有为 true 的时候才会获取到元数据
    decorate_events => true
    #从最早的偏移量开始消费
    auto_offset_reset => 'earliest'
    #auto_offset_reset => "latest"
    #提交时间间隔
    auto_commit_interval_ms => 1000
    enable_auto_commit => true
    codec => json {
      charset => "UTF-8"
    }
  }
}

filter {
    if [log][file][path] == "/usr/share/filebeat/nexus-logs/outbound-request.log" {
        grok {
            match => {
                "message" => "\[%{HTTPDATE:timestamp}\] - \"%{WORD:outbound_request_method} %{URIPROTO:outbound_request_protocol}://%{URIHOST:outbound_request_host}%{URIPATH:outbound_request_path} HTTP/%{NUMBER:outbound_request_http_version}\" %{NUMBER:outbound_request_status_code} %{NUMBER:outbound_response_size} %{NUMBER:outbound_request_time}\s*%{DATA:outbound_request_othermsg}$"
            }
        }

        mutate {
            remove_field => [ "message" ]
        }
    } else if [log][file][path] == "/usr/share/filebeat/nexus-logs/request.log" {
        grok {
            match => {
                "message" => "%{IP:clientip} - - \[%{HTTPDATE:timestamp}\] \"%{WORD:request_method} %{URIPATH:request_path} HTTP/%{NUMBER:request_http_version}\" %{NUMBER:request_status_code} %{NUMBER:request_bytes} %{NUMBER:request_duration} %{NUMBER:request_redirect_num} \"%{DATA:request_agent}\"\s*%{DATA:request_othermsg}$"
            }
        }
        mutate {
            remove_field => [ "message" ]
        }
    }

    mutate {
      add_field => { "logstash_source" => "${HOSTNAME}" }
    }
}

output {
    if [fields][app] == "nexus" {
        elasticsearch {
            hosts => ["https://192.168.31.168:9200","https://192.168.31.171:9200","https://192.168.31.172:9200"]
            ilm_enabled => false
            user => "elastic"
            password => "123456"
            index => "nexus-%{+YYYY.MM.dd}"
            cacert => "/usr/share/logstash/config/ca.crt"
            ssl => true
            ssl_certificate_verification => false
        }
    } else if [@metadata][kafka][topic] == "system-logs" {
        elasticsearch {
            hosts => ["https://192.168.31.168:9200","https://192.168.31.171:9200","https://192.168.31.172:9200"]
            ilm_enabled => false
            user => "elastic"
            password => "123456"
            cacert => "/usr/share/logstash/config/ca.crt"
            ssl => true
            ssl_certificate_verification => false
            index => "system-logs-%{+YYYY.MM.dd}"
        }
   } else if [@metadata][kafka][topic] == "nginx-logs" {
        elasticsearch {
            hosts => ["https://192.168.31.168:9200","https://192.168.31.171:9200","https://192.168.31.172:9200"]
            ilm_enabled => false
            user => "elastic"
            password => "123456"
            cacert => "/usr/share/logstash/config/ca.crt"
            ssl => true
            ssl_certificate_verification => false
            index => "nginx-logs-%{+YYYY.MM.dd}"
        }
   }
}
$ docker restart logstash
-
kibana 中查看 index 是否创建成功
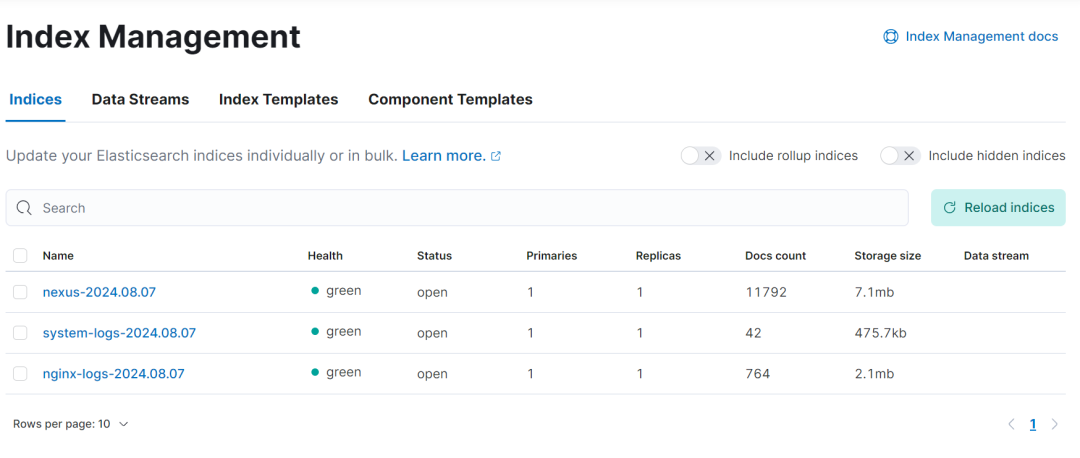
-
创建 index pattern
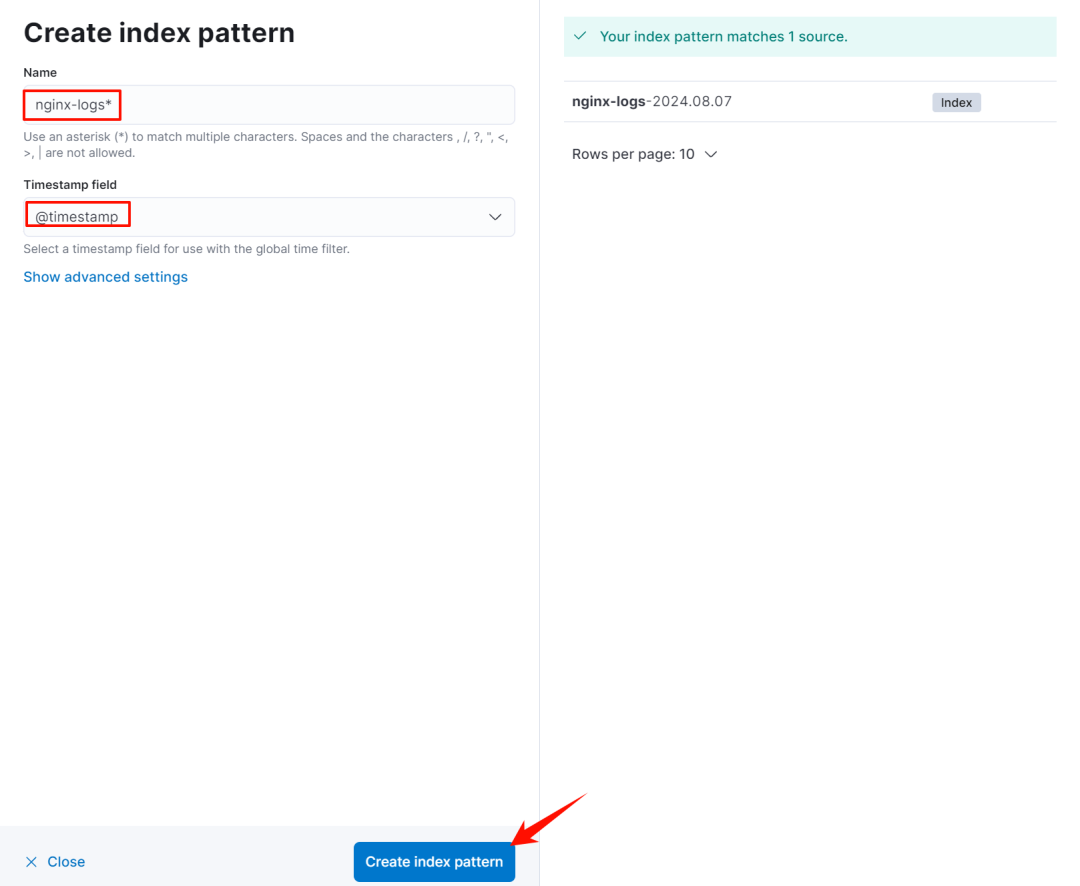
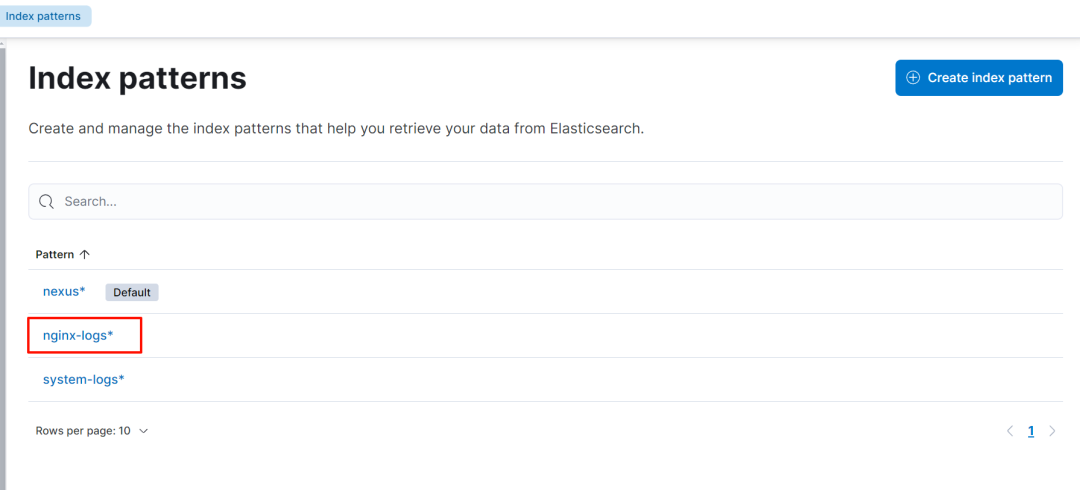
-
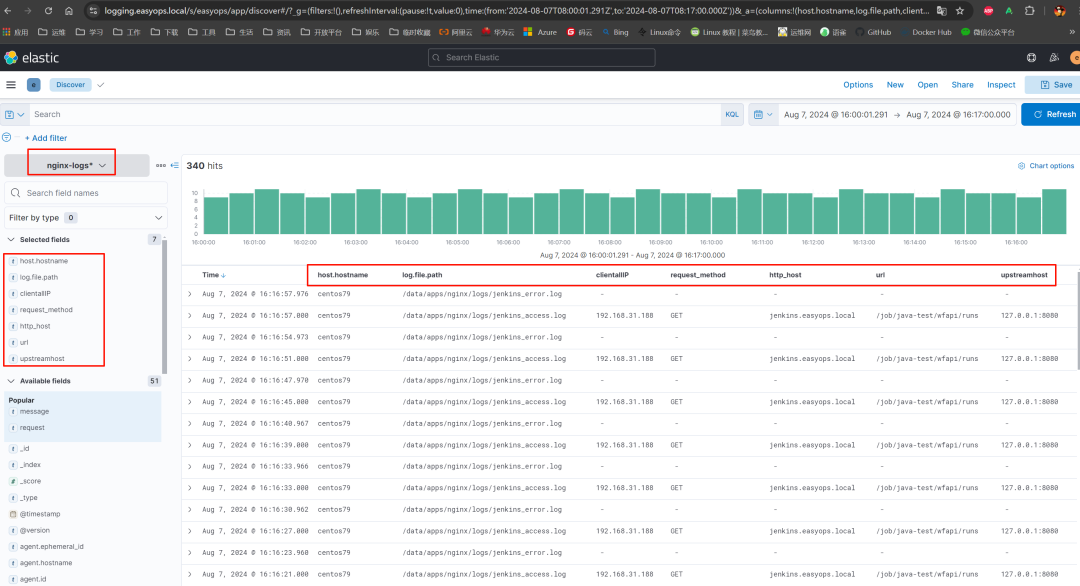
discovery 中检索日志

![【学习强国】[挑战答题]带选项完整题库(2020年4月20日更新)-武穆逸仙](https://www.iwmyx.cn/wp-content/uploads/2019/12/timg-300x200.jpg)


![【学习强国】[新闻采编学习(记者证)]带选项完整题库(2019年11月1日更新)-武穆逸仙](https://www.iwmyx.cn/wp-content/uploads/2019/12/77ed36f4b18679ce54d4cebda306117e-300x200.jpg)


